• Facebook
  • Instagram
  • Mail
  • Youtube
Call 1-800-8-HUMMEL
  • 0Shopping Cart
Lägler North America
  • Machines
    • SURFACE
      • HUMMEL
      • SUPERHUMMEL
    • FINE SANDING
      • TRIO
      • SINGLE
    • EDGE/STAIRS/CORNER
      • FLIP
      • ELAN
      • UNICO
  • Machine Parts
    • HUMMEL
    • SUPERHUMMEL
    • TRIO
    • FLIP
    • ELAN
    • SINGLE
    • UNICO
  • ABRASIVES
    • Buy Abrasives
  • Blog
  • PST®
  • Newsletter
    • Lägler Direkt Archive
    • Subscribe | Email Newsletter
  • Warranty
  • Contact
    • Become a Distributor
    • Info Request Form
    • Submit Photo | #LaglerOfTheDay
  • News & Events
  • Menu Menu
You are here: Home1 / Blog2 / 2016

The Most Popular, Most Helpful Lägler N.A. Content of 2016

We’re doing what people do at the end of one year, beginning of another. We look back at what we did well and what we can improve. We always want to keep
doing better.

That runs from machine designs and production at the factory in Germany to customer service, certification training and every way we connect with you pros
online here in North America.

We kicked off a new, mobile-friendly website in 2016. With it came a blog, and we started social media pages on Instagram, Facebook,
Twitter and YouTube. We started making videos and answering top questions you have about using and
maintaining Lägler machines.

Added up, you all spent about five work weeks of the year learning from the content on our blog. That’s a great start, and we aim to build on that in the
coming year.

Here’s a recap, highlighting the most popular how-to topics and just plain fun social media posts.

What is Lägler Premium Sanding Technology (PST) Certification Training?

TOP BLOG CONTENT

Lägler Certification: What is Lägler PST?

Our most viewed blog page. Like we say in that post, our training program is about two things:

1. Building relationships with contractors, letting them know we are the true resource about Lägler machines and we’re ready to help.

2. Helping contractors to maximize success with their sanding and finishing businesses.

In this post, we describe the Lägler process that gets you the most out of every floor while taking the least time on the job. Greatest efficiency for
the flattest floors. We tell what the one-day certification course costs and why we offer it at a financial loss to ourselves.

Nothing builds trust like truth and, of course, quality machines you can count on for many years. That’s what we bank on every day.

Read the full post, “Lägler Certification: What is Lägler PST?”

TOP HUMMEL® BLOG POSTS

Not surprisingly, HUMMEL blog posts are a favorite among all our topics. It’s the most popular Lägler machine in North America, and is used by many thousands
across the world.

How to Replace a Lägler HUMMEL Sanding Drum

This post tells the two most important things to know about the HUMMEL drum. It also includes step-by-step instructions.

The video in this post shows proof that the HUMMEL design maintains its nearly 50 years of original engineering while also taking on all the parts that
have been refined along those many years. New parts on, say, a 1983 machine? No problem. Maintain and roll on.

Read the full post, “How to Replace a Lägler HUMMEL Sanding Drum.”

Why You Should Sand Wood Floors at an Angle and Left to Right | Lägler North America Blog

Why You Should Sand Wood Floors at an Angle + Left to Right

We’ve refined our thinking on sanding at an angle. For example, we used to recommend cutting at an angle for the first pass, and then with the direction
of a straight-laid floor for finer grits.

Now, we recommend using at least a slight angle for each pass. It’s all about getting the flattest results.

We also explain why to sand left to right as you move across the field of a room, and why you should not sand right to left, if you want to achieve the
best results.

Read the full post, “Why You Should Sand Wood Floors at an Angle + Left to Right.”

4 Reasons Not to Use a Wire-Brush Drum with a Lägler HUMMEL

We know the wire-brushed look is especially cool with current trends in wood flooring. But we also know the reasons you don’t want to throw a wire-brush
drum on your HUMMEL for that job.

What did we say about truth above? Truth builds trust, and trust us when we say we are focused on quality floors and offering the best information we have
to you.

Read the full post, “4 Reasons Not to Use a Wire-Brush Drum with a Lägler HUMMEL.”

Do you have Lägler HUMMEL questions and helpful content ideas? Use the Contact link in the menu heading above to submit your suggestions.
We want to tackle all the information that will be helpful to you in the field with future blog and video posts.

TOP FLIP® BLOG POSTS

The FLIP edger finally is getting its due in North America. The machine was launched in 2001 in Germany, and now is becoming much more widely known and
used here. Search #LaglerFLIP on
Instagram to see photos and videos from some of the guys who are using it — and bragging about it — across the land.

How to Use the Lägler FLIP Corner Attachment | Lägler North America Blog

How to Use the Lägler FLIP Corner Attachment

How do you handle room corners, around pipes, and between railing balusters? You could scrape. You could use an orbital sander in some of those spots.
But the FLIP corner attachment is the high-speed tool that knocks it all out the cleanest and quickest.

The FLIP is sold with the short and corner attachments, and this blog post includes tips for using both.

Read the full post, “How to Use the FLIP Corner Attachment.”

How to Adjust Lägler FLIP Sanding Pressure

Like everything with Lägler machines, the engineers have lightened the pro’s load on the job. With the FLIP, don’t burn out your shoulders to add a touch
of pressure here or there. Just use as recommended.

This blog post gives step-by-step instructions for making sure the FLIP is cutting as expected. It tells how to set the pressure based on which attachment
you’re using, and in only of seconds of effort on the job.

The CAD drawings in this post also show what goes wrong when you’re edger is running on off-kilter settings like an old sea captain with an uneven peg
leg.

Read the full post, “How to Adjust FLIP Sanding Pressure.”

What Lägler FLIP questions and helpful content ideas do you have? Tell us, using the Contact link in the menu heading above. We want to
turn those questions into useful blog and video posts to help everyone #LearnMoreEarnMore.

TOP TRIO BLOG POSTS

What is a surefire way to know when a floor sanding guy doesn’t own a TRIO and hasn’t participated in Lägler’s Premium Sanding Technology (PST®)
certification training? He calls the machine a buffer and thinks it slows down the process.

For those who know better, we’re building our how-to TRIO content. For those who want to test-drive a TRIO and see why so many others swear by it, read,
“What is Lägler PST?”
and get in touch with us.

How the Lägler TRIO Sanding Disc Arrows Help You to Extend the Life of Your Abrasives | Lägler North America Blog

Lägler TRIO: Sanding Disc Arrows + Abrasives

Let’s veer off the path for a minute. Have you ever noticed on the gas gauge in your truck that arrow next to the little silhouette of the gas pump that
either points left or right? It’s a reminder, showing you on which side of the vehicle your gas tank is when you pull up to the pump at the gas station.

Well, the TRIO has a similar reminder on its three sanding discs. This blog post tells why the arrows cast in the plate are there and how that plays a
part in extending the life of your abrasives.

The post also talks hard plates and donuts. Getting hungry? Read the full post, “Lägler TRIO: Sanding Disc Arrows + Abrasives.”

How to Clean the Lägler TRIO Filter

What are the three things you need to know about cleaning the TRIO filter? What is the one thing you really shouldn’t ever do and, we’re willing to bet,
you or someone on your crew has done?

This post includes a super-short video and the three simple steps you should use to clean your filter in only seconds.

Read the full post, “How to Clean the Lägler TRIO Filter.”

How to Dismantle and Reassemble the Lägler TRIO Filter Unite | Lägler North America Blog

How to Dismantle + Reassemble the TRIO Filter Unit

Right off the top, this post tells three signals it’s time to get into your filter unit for some basic maintenance.

Don’t push the TRIO to the side, because you aren’t sure what’s wrong. And don’t use time and money to have someone else handle it. You’ve got this.

Step-by-step instructions in this post lay out exactly what you need to know. It’s also good to keep your manual handy. Read when in need.

Read the full blog post, “How to Dismantle + Reassemble the Lägler TRIO Filter Unit.”

What Lägler TRIO questions and blog/video ideas do you have? The Contact link in the menu heading above is your path to telling us. We
can turn your question – which likely is a common question many others have – into helpful blog content for everyone.

TOP VIDEO CONTENT

We started a YouTube channel this past year. It’s great for embedding videos in our blog posts. If you watch as much on YouTube as you do on TV, like your kids do, look us up and
subscribe.

But we also post our videos on Instagram and Facebook, where these videos (mostly how-to) add up many times more views. (If you aren’t promoting your business
on social media and want to learn, give these blog posts a look: “Social Media for Wood Flooring Pros”
and “Interview with a Contractor: Social Media Success.”)

So view our videos using whatever app you favor. Below is one of our most popular, “How to Replace a HUMMEL Sanding Drum.”

Follow Lägler North America Content

Follow our blog and more content through our monthly email newsletter and our Facebook, Instagram, Twitter and YouTube social media
pages.

Share your content suggestions using our contact page.

And make 2017 your biggest yet. We’ll be here.

https://www.laglernorthamerica.com/wp-content/uploads/2020/02/Content-Year-in-Review-scaled.jpg 1440 2560 webmaster https://www.laglernorthamerica.com/wp-content/uploads/2020/02/logo2-300x90.png webmaster2016-12-27 01:25:502020-02-29 01:35:30The Most Popular, Most Helpful Lägler N.A. Content of 2016

Interview with a Contractor: Social Media Success

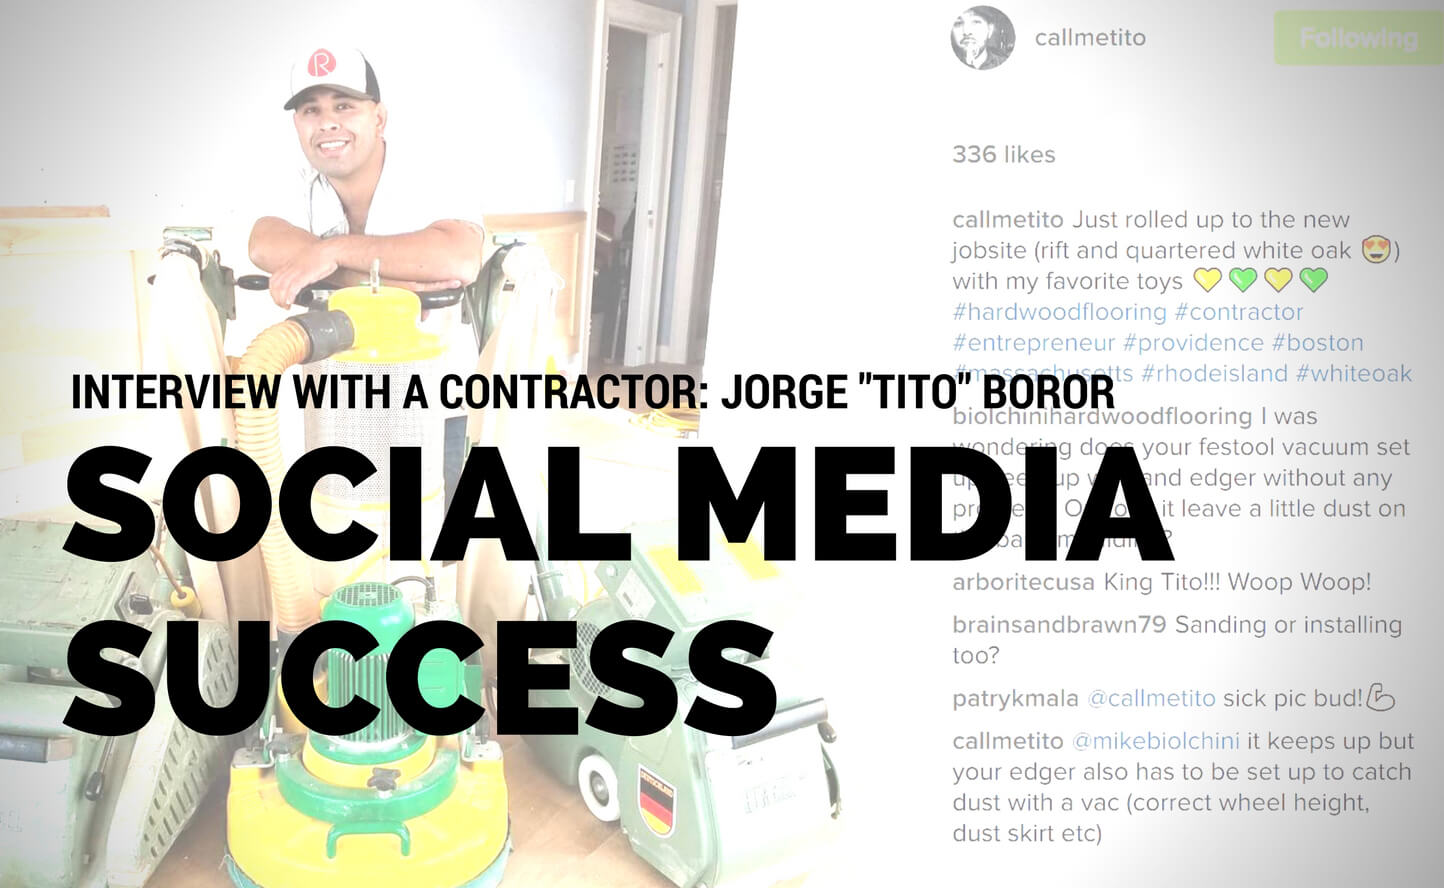
Many who follow us on social media, especially on Instagram, also know Jorge Boror (“Tito”), at least through the social app. Tito has been building his
wood flooring business, Rende Hardwood Flooring in Providence, R.I., for more than a decade. He fired up its social media pages in 2012.

In recent months, we saw Tito’s Instagram account (@callmetito) blow up. He had a very respectable 2,500 followers one day. Then after he posted a photo in May, showing a hexagonal
tile-to-wood installation with N.S. Builders in Boston (@nsbuilders)
… Man, he hit a new level. That photo alone got almost 3,000 likes and well over 100 comments. Less than seven months later, Tito’s Instagram
following is approaching 15,000.

Jorge "Tito" Boror on Instagram

Social media isn’t magic. This one example with Tito doesn’t mean it happens that way for everyone, or hardly anyone. But think about this: Tito’s “overnight”
social media marketing success was four years in the making.

And it happened because of the wood flooring business he’s been building since 2006, the skills and partnerships, like the one with N.S. Builders. Social
media has been a tool to help highlight those foundation pieces, not the other way around.

To make his social pages successful, Tito is consistent, responding to customers and industry pros looking for help. He shows who he is, floor man and
fisherman, and shares what he knows and admits what he doesn’t.

Most recently on Instagram, he’s making a bigger move into videos and has started a friendly community for contractors to connect (#floortalk).

We asked Tito about his social success through Instagram direct message.

Tito’s path to social media success …

I remember 15 years ago, working full time sanding floors out of high school, I was always bored with no outlet to anyone else in the industry. The NWFA was around, but I thought they were geared for manufacturers only. I was very lonely. When I quit and started my business, I still felt lonely (I do enjoy my down time, but I enjoy interacting with people more). The loneliness didn’t start to evaporate until 2012 when I joined Instagram and started posting pictures of my 2006 HUMMEL.

Jorge Boror's first wood flooring Instagram post, in 2012

There were only about 4 or so floor guys I would communicate with on a regular basis back then, but just those 4 guys made me feel less lonely. Social media has always been an outlet to the world for me and something I’ve enjoyed. I started posting about my daily life and work. Slowly, social media made work fun again and, eventually, the fun turned into the white-hot passion it is today.

My main goal originally with social media was to get leads. I posted floors and floors and more floors in hopes that potential floor owners would like what they saw and call. It worked.

However, most recently I have been getting lots and lots of engagement from other wood flooring contractors all over the globe. I’ve received an overwhelming amount of support, enthusiasm and feedback from new and veteran contractors on Instagram. Because of them I’ve decided to switch it up and make my entire feed for the contractor.

I don’t want to go the machine and finish review route, that’s not me. I’d rather chat shop and experiences. That’s why I started #floortalk, to give guys an outlet, the same outlet I was looking for in the 90s when I was employed, lonely and bored.

Jorge "Tito" Boror started a wood flooring shop-talk community on Instagram called #floortalk

I make content for them. I have been a contractor long enough that I know every struggle we face. I answer every DM I get when someone has a problem or question. I’ve inspired a lot of guys to be better and they’ve inspired me to be creative, provide content and put up posts for them to check out while they take breaks from edging or running the big machine all day.

We’ve been successful on turning Instagram leads into paying and returning clients. The clients that find us on IG seek us out because of the passion we show for the trade. Often times these leads are open invite and we aren’t bidding against anyone else, and close ratios are high.

They are as organic and high quality as a lead can get. When I arrive, they feel like they already know me, they expect to see me deliver the same enthusiasm I show on all jobs. They ask about the TRIO and expect me to deliver an experience. It’s such a fun feeling closing a sale that came to be because of Instagram.

My latest thing is IG videos. I recently had one follower request that I start posting more videos. This was a few weeks ago. I have no idea why his request struck such a chord with me, but it did and since then, I’ve made it my responsibility to fulfill his request.

The latest efforts of mine stem from wanting to support my fellow wood flooring contractor. Ultimately, my goal is to make guys rediscover their passion for wood floors and support the new guys that want to break in the industry.

Learn Benefits + Tips for Successful Social Marketing

To learn how to boost your own social media marketing game, read “Social Media for Wood Flooring Pros.” It includes nine benefits
to marketing your flooring business using social media and three tips to make it a success without taking a lot of time.

Join Lägler North America Instagram, Facebook, Twitter + YouTube

More Blog Content

HUMMEL: Why You Should Sand at Angles + Left to Right

TRIO: Sanding Disc Arrows + How to Extend the Life of Abrasives

FLIP: How to Adjust Sanding Pressure

https://www.laglernorthamerica.com/wp-content/uploads/2020/02/Tito-Social-Media-Blog-Post.jpg 888 1444 webmaster https://www.laglernorthamerica.com/wp-content/uploads/2020/02/logo2-300x90.png webmaster2016-12-13 01:36:192020-02-29 01:41:11Interview with a Contractor: Social Media Success

#HUMMELtip: Sand Wood Floors at an Angle + Left to Right

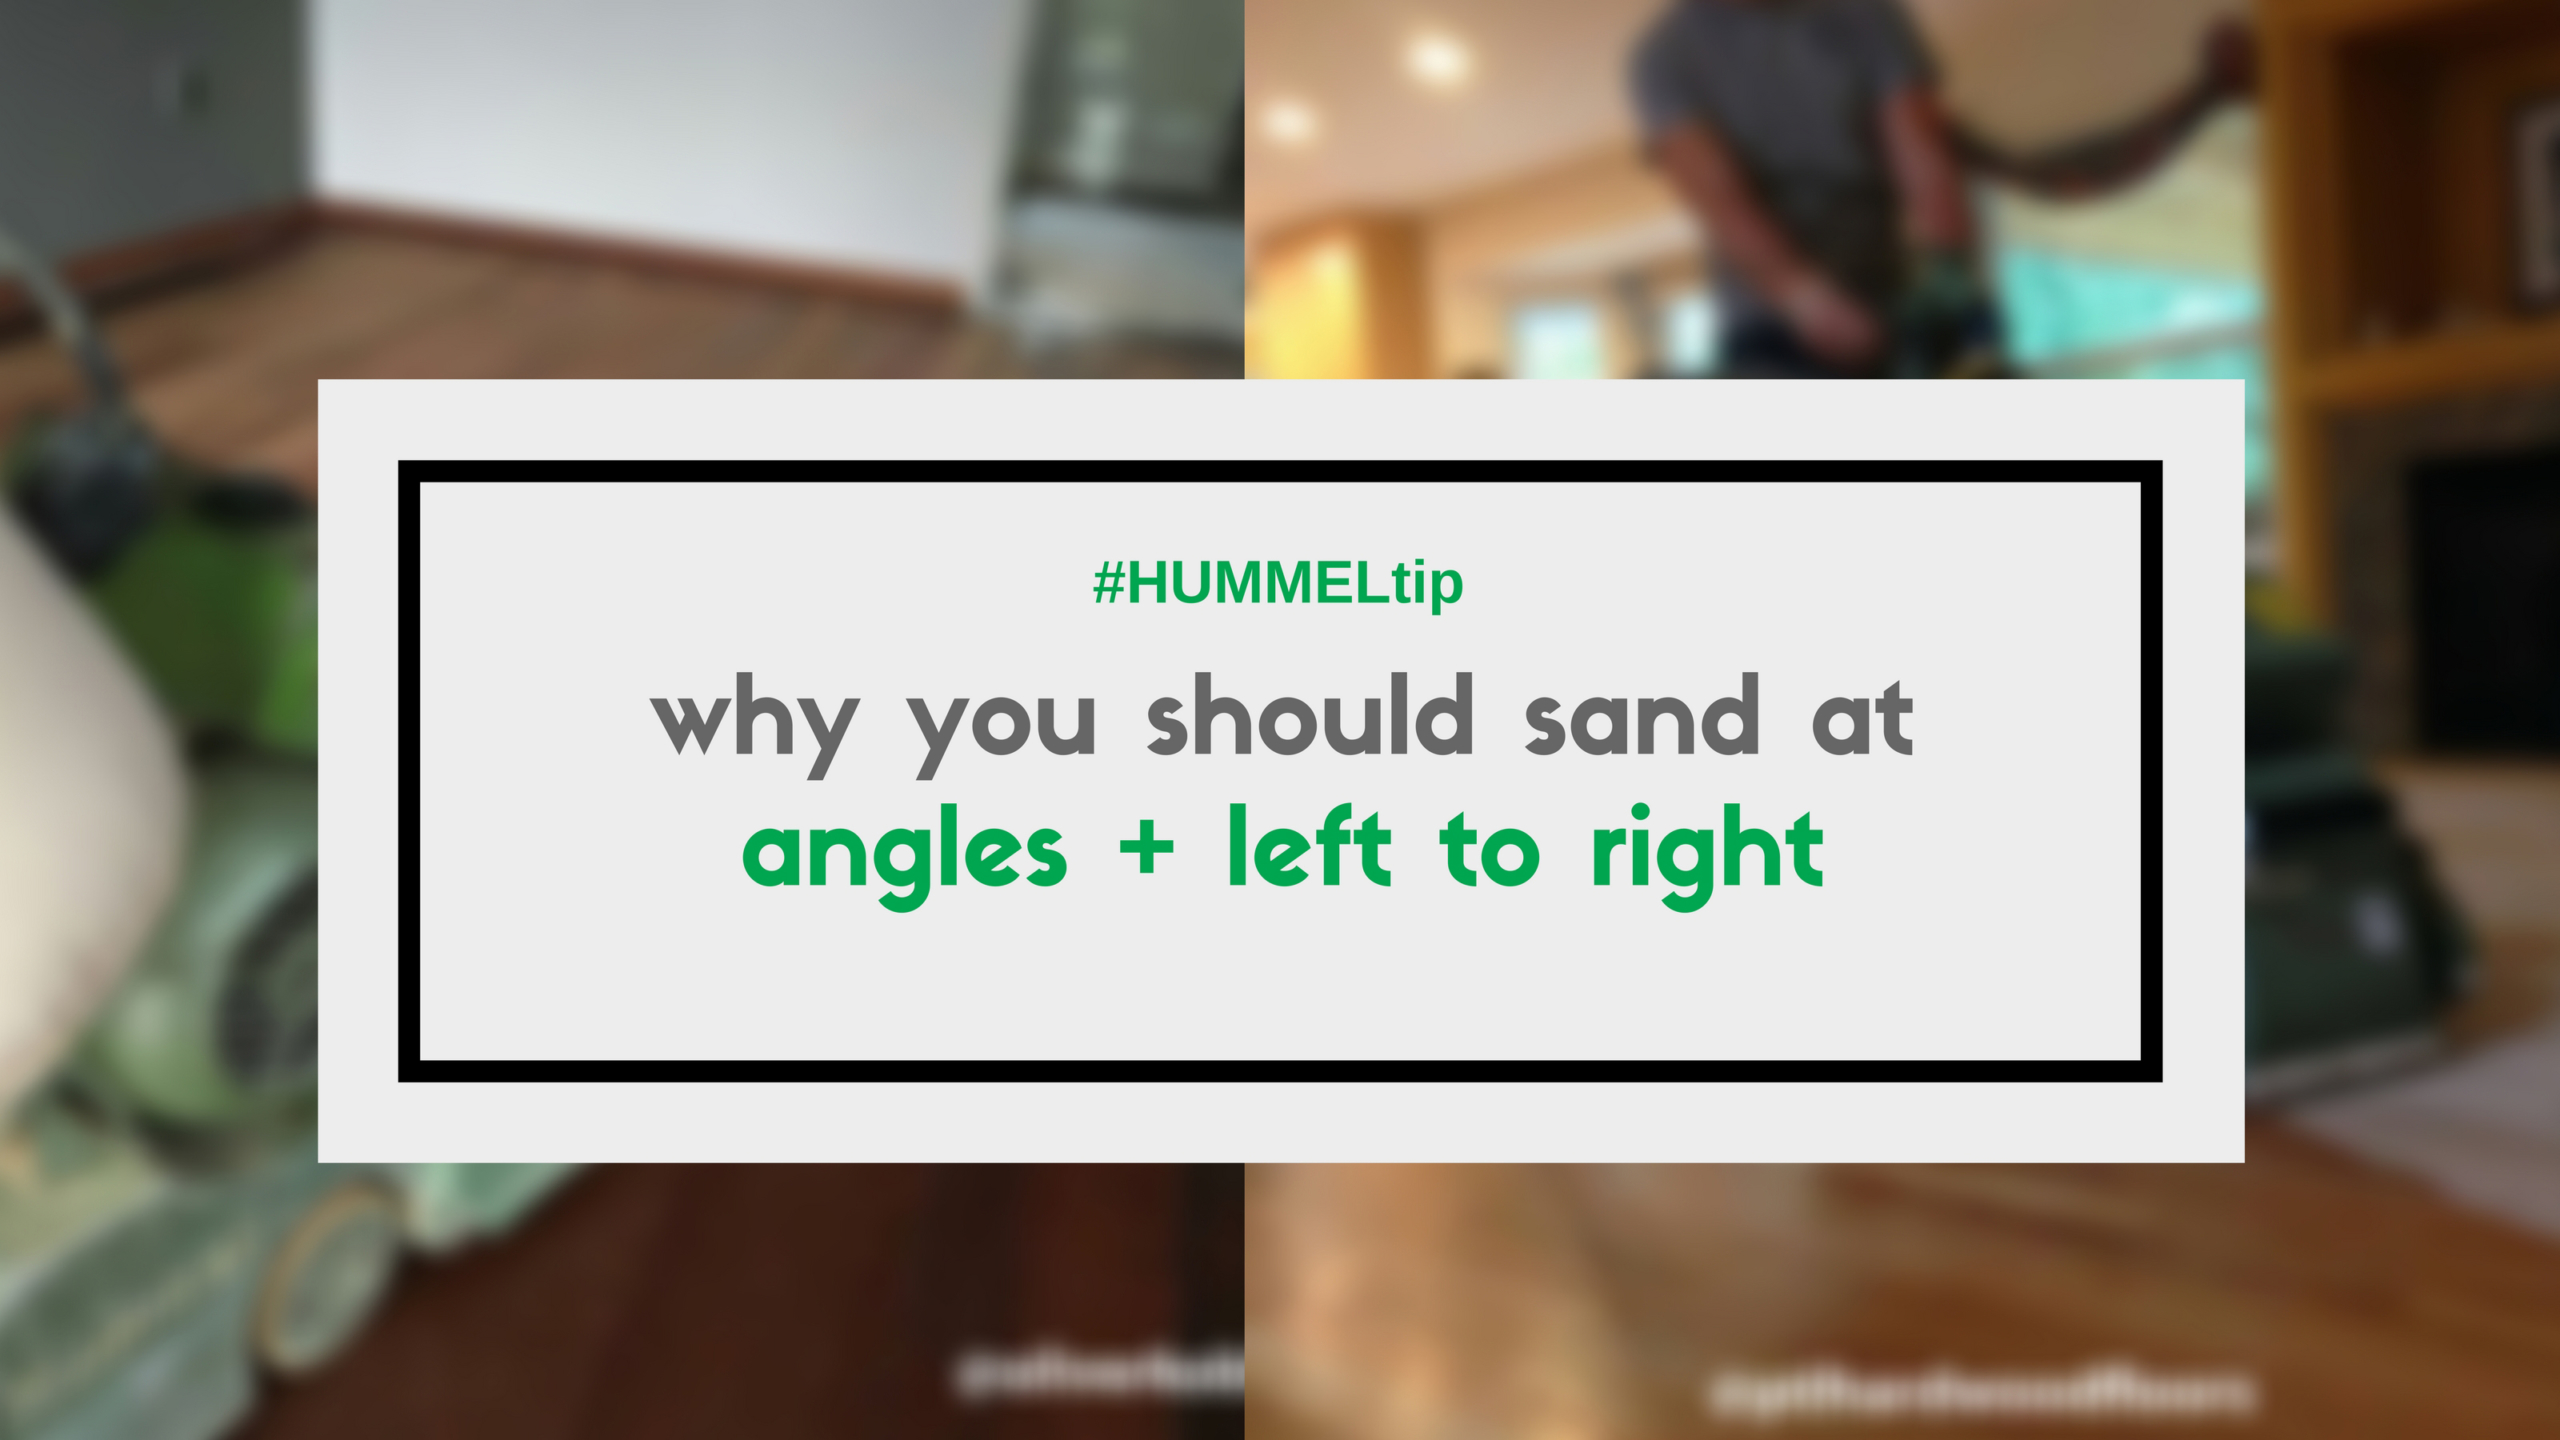
Why You Should Sand Wood Floors at an Angle + Left to Right

Every day here we’re talking about doing things better, the internal stuff our staff does to make this shop hum and the ways to help you do better on the
job site.

We look at improving skills using Lägler sanding machines and maintaining those machines, repairs that keep your sanders in money-making shape for years
and years.

We hit up do-it-better on this blog and on our social media pages – Facebook,
Instagram and Twitter. We especially cover it during our one-day Lägler certification classes: Premium
Sanding Technology (PST®) training [Read: Lägler Certification: What Is Lagler PST®?]

And through our own practical experiences and by getting to know so many of you over the years in PST training, at NWFA’s Wood Flooring Expo, via social media, and on the phone, we know there is more than one way to get results
on the job.

Three #LaglerOfTheDay posts highlighting HUMMEL pros cutting at the recommended angles. See more of their work -- and ours -- on Instagram.

Here’s the question. What kind of results are you aiming for: good, better or best?

The results we’re talking about in this post are top-tier, the results that help you solidify your business with referrals and craftsmanship that, maybe,
even is worthy of fatter paydays.

You handle your business and opportunities, of course, but we take pride in helping you refine your skills with these Lägler machines. (Not to be salesy
or anything, but did we mention PST certification?)

In the hopper today … sanding path and angles with the “big machine,” the HUMMEL.

Sanding Path for Straight-Laid Wood Flooring

Before you drop the drum and start cutting fresh life into a wood floor, you look at how to knock out the room as efficiently as possible, right?

Some sand right to left across the field, while others cut left to right (recommended, as explained below).

Many shoot straight, parallel with the floor boards. Others cut at an angle, slanting slightly across boards.

The Three Biggest Big-Machine Sanding Techniques We Recommend

Sand left to right as you move across the room.

Sand at an angle. We recommend 15 to 45 degrees [Source: Lägler’s “Sanding of Wooden Floors” manual]. The industry’s leading resource
[National Wood Flooring Association (NWFA)] cuts
slightly shallower with its first-pass recommendation of “a minimum seven to 15 degrees … More aggressive angles (up to 45 degrees) may be necessary
to achieve flatness in more extreme cases.”

Criss-cross like an X. If you make your first pass sanding at an angle starting in the left corner (let’s call it home plate, as a reference
point), sand with the next grit at an angle starting from the right corner (first base). (All while moving left to right across the field)

Sand at angles to the floor boards with the Lagler HUMMEL belt sander

Why sand left to right with the Lägler HUMMEL?

The HUMMEL’s eight-inch sanding drum is positioned
at the right edge of the machine. The wheel that sits behind the drum, of course, will always run on the freshly sanded surface as it trails the drum
with the belt on it, sanding the floor.

Because the drum is on the right side of the HUMMEL, the left wheel runs on whatever surface – sanded or not yet sanded – the left side of the HUMMEL passes
over.

By sanding left to right across the field of the room, all wheels of the HUMMEL will run on the same sanded surface, meaning the machine
will be level and the floor will result in optimal flatness.

When sanding right to left with the HUMMEL, the machine is slightly off-balance, with the left side running on the surface yet to be cut.

Yes, that’s a minor difference. But, again, we are talking about good, better or best.

Sand while moving left to right across the wood floor sanding field when using the Lagler HUMMEL belt sander big machine

Why sand at an angle with the Lägler HUMMEL?

You know better than most what happens to wood flooring over time, especially when your sanding and refinishing mission is to bring back from the dead
a decades old (or older) floor with too many DIY coats of finish, paint, lacquer and who-knows-what on it to count.

Wear from use. Movement from the building settling and the floor shifting. Cupping, damage and neglect.

There are two ways to attack this demon with the HUMMEL: straight on or at an angle.

Obviously, we are doing this blog post to say, “angle.” But here’s why.

If you sand with the direction of the floor boards, you are maintaining what has happened to that floor over time. You’re giving it a
new look, no doubt. But the flatness …

When you sand at an angle, you are:

  • Cutting across imperfections from movement, damage and neglect
  • Avoiding the vibration of loose boards that cause chatter
  • Avoiding waves rolling down the length of the boards

Until recently, Lägler recommended in its sanding methods manual to sand at an angle except for the final pass.

When sanding at an angle, at first, the scratch pattern will be more noticeable than when you cut with the direction of the floor boards. But as you sand
with increasingly finer grits and, especially, if you use a fine sanding machine (e.g. Lägler TRIO) in
the process, you will remove those scratches.

We now recommend to sand at an angle for all passes with the HUMMEL, following the correct grit sequence. That means never skipping more than one grit
in the process. Otherwise, everything we just said about flatness and removing scratch patterns is out the window.

Special Case: Sanding Cupped Flooring

Like always, there is an exception to the rules. When the floor boards are cupped, you’ve got to level them with a head-on approach.

Sand with the direction of the floor to knock off the edges of the cupped boards. Then go into the game plan described above, cutting at angles.

When sanding cupped wood floors, first sand with the floor layout to take off the cupped edges with the Lagler HUMMEl belt sander

Sanding Direction for Multi-Directional Wood Flooring

Wood flooring patterns that make it impossible to run parallel to the floor layout, as is possible with strip flooring, call for sanding at a 45-degree
angle to the wood grain direction.

Basically, don’t sand with the lengthwise flow of any section of flooring. For example, when sanding herringbone or chevron patterns, sand across the intersections
of the floor boards. Otherwise, running with the length of some boards would mean running perpendicular across the width of other boards.

Like We Say, #LearnMoreEarnMore

We go more in depth about the sanding techniques that get you paid in our Premium Sanding Technology (PST®) certification training. It’s one-day-long,
with classes limited to one company and no more than five people at a time.

Bring your crew to our Denver spot, and make a mini-vacation out of it to ski, mountain bike, fly fish or just hit any (or all) of the 230 breweries in
our state (more than 10 percent of the total number in the U.S.). We might be able to make some recommendations on those too.

Learn more about PST on our blog
and call us at 800-8-HUMMEL to schedule a training date that works best for you.

Related Blog Posts

How to Remove the Lägler HUMMEL Motor

4 Reasons Not to Wire Brush with a Lägler HUMMEL

How to Replace a Lägler HUMMEL Sanding Drum

https://www.laglernorthamerica.com/wp-content/uploads/2020/02/HUMMEL20-20Sanding20Angle-scaled.jpg 1440 2560 webmaster https://www.laglernorthamerica.com/wp-content/uploads/2020/02/logo2-300x90.png webmaster2016-11-15 18:26:582020-02-29 18:38:13#HUMMELtip: Sand Wood Floors at an Angle + Left to Right

Lägler TRIO: How to Change the Tooth Belt

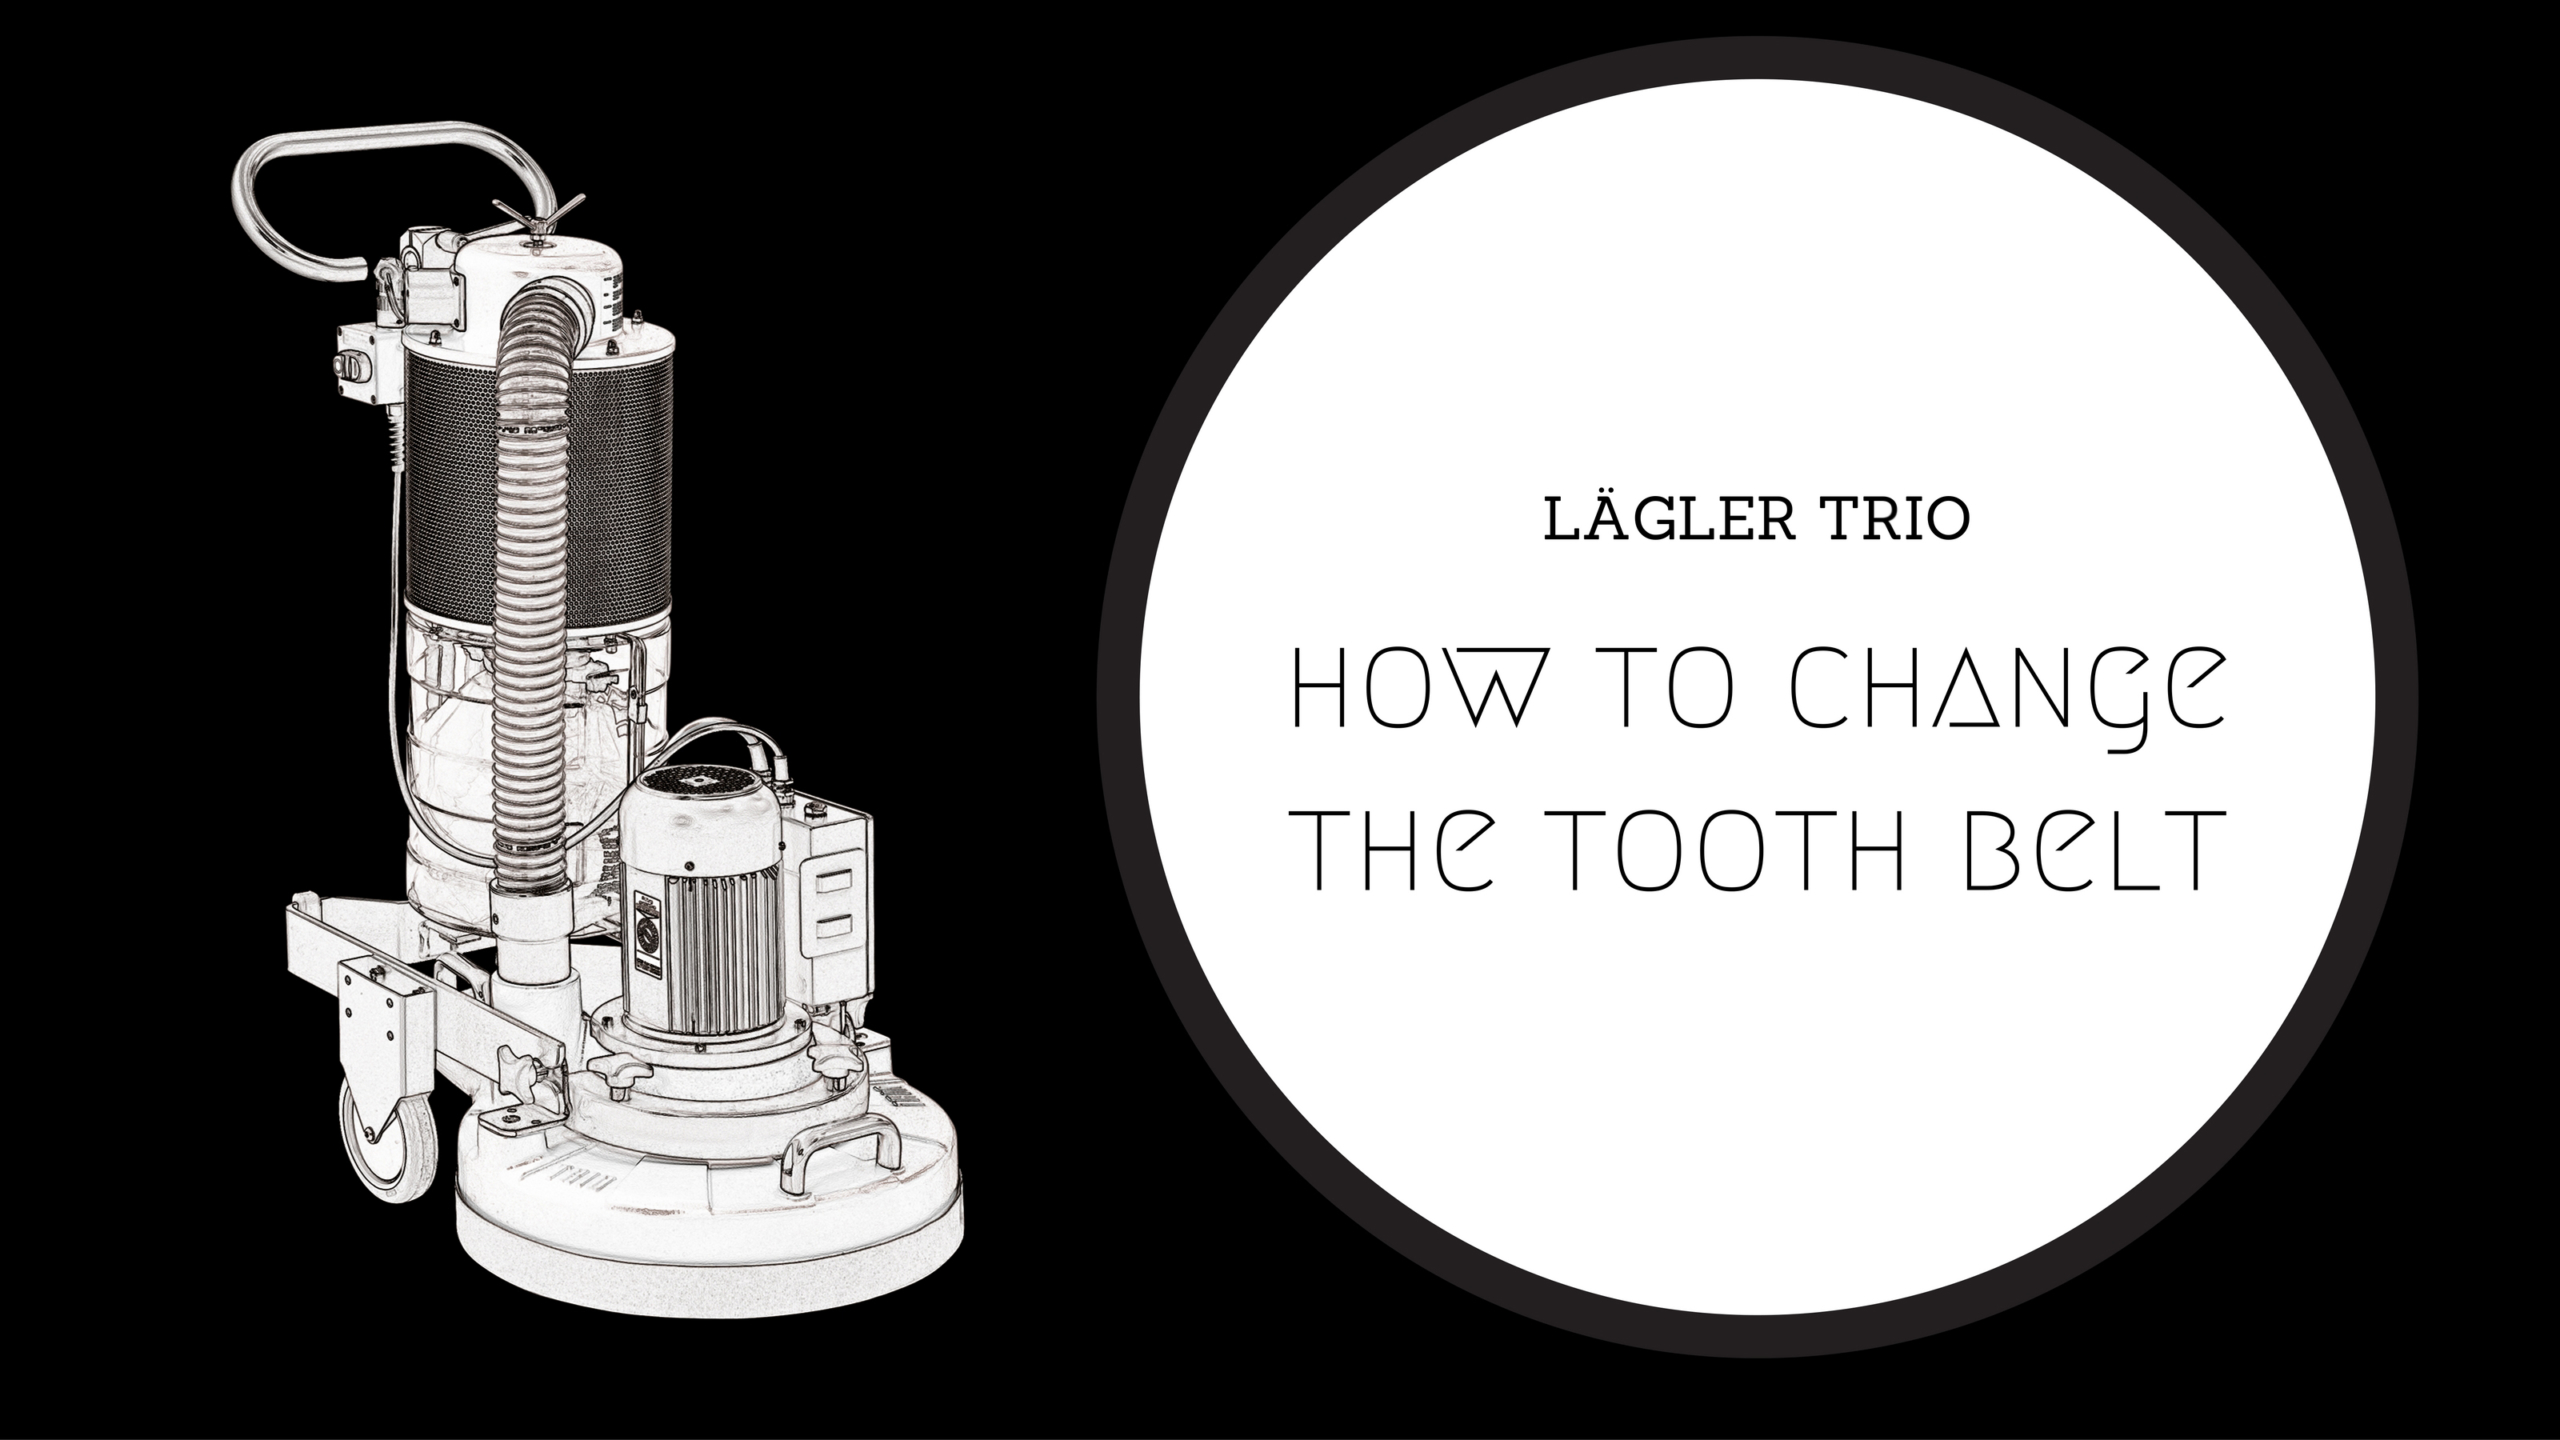
Good condition of the tooth belt, or the belt that turns the three sanding plates (discs) of the Lägler TRIO fine sanding machine, is critical. No belt,
no sanding. It’s that simple.

In this post, and the video below, we give step-by-step instructions for removing the current belt and replacing it with a new belt.

How to Know When the Tooth Belt Needs to Be Changed

It can be difficult to know when to change the belt, unless it’s the most obvious situation: a three- or four-year-old belt that has dried and become brittle,
and then breaks. In that case, the sanding discs will not turn.

Otherwise, a common way to recognize when the tooth belt needs to be changed is to notice decreased RPMs and less dust filling the dust bag.


How to Remove the Tooth Belt

Starting with the machine turned off and unplugged from power:

1. Lock the handle into its forward position, using the clamping lever at the front of the handle.

2. Lean the TRIO backward to rest safely on the two protective cushions at the back-bottom of the machine’s frame, and on the guide tube.

3. Remove the sanding plates by grabbing the edges and pulling the plates away from the machine, disengaging the TRIO’s three prongs from their rubber
jigs. Caution: Do not use a screwdriver or other tool to pry the plates away from the machine; prying with tools can cause damage.

4. Remove the eight screws of the cover and remove the cover. Recommended: Check the sealing felt on the inside of the cover and replace as needed.

5. Loosen the counter nut of the belt tensioner, using a 17mm wrench, by turning the nut all the way back against the casing wall.

6. Expand the spring by turning the second nut back to the counter nut.

7. Push the belt tensioner back and remove the belt.

8. Use a vacuum to remove dust and dirt inside and around the pulley mechanism.

How to Change the Lagler TRIO Tooth Belt

How to Insert a New Tooth Belt

1. Push the belt tensioner all the way back to the casing wall.

2. Insert the new belt with the geared side facing and engaging the pinion gearing, with the flat side of the belt skirting the gear bearings.
Caution: Incorrectly inserting the belt can cause damage to the machine.

3. Tighten the spring using the nuts to adjust the spring to the proper length:

a. Orange spring: 55 millimeters (approx. 2 1/8”)

b. Blue spring: 52 millimeters (approx. 2”)

4. Replace the cover, fastening it with the eight screws previously removed

5. Mount each sanding plate by first inserting one of its three prongs (locking bolts) into one of the rubber jigs, then fitting the other two into their
respective positions. Press the plate into position as far as it will go.

6. The belt replacement is complete. Stand up the TRIO, readjust the handle to your preference for use. You’re ready to sand again.

Related Blog Posts

How to Clean the Lägler TRIO Filter 

How to Dismantle + Reassemble the Lägler TRIO Filter Unit

Arrows + Abrasives: How to Extend the Life of Abrasives Using the TRIO 

Related Parts

P949 (Tooth) Belt

P953 Sanding Disc, Complete

https://www.laglernorthamerica.com/wp-content/uploads/2020/02/TRIO-belt-title-scaled.jpg 1440 2560 webmaster https://www.laglernorthamerica.com/wp-content/uploads/2020/02/logo2-300x90.png webmaster2016-11-02 18:38:222020-02-29 18:42:16Lägler TRIO: How to Change the Tooth Belt

Fly + Sand: Who, What, Why?

We recently wrapped up our second Lägler Fly and Sand trip of 2016. It was a new step for us and Lägler GmbH, in nearly 10 years of offering this lottery,
to put together two trips in the same year. We rounded up American contractors for the trip in July, followed by a Canadian group in September.

For those who have been part of a Fly and Sand – touring German countryside, taking in a collection of villages and cities, restaurants and vineyards –
this experience is once in a lifetime. It combines seeing some old-world Europe with the passion everyone involved shares for their wood flooring craft.

We see friendships and business contacts being built on these trips. It’s awesome to us to be part of connecting these industry dots across North America.
We get to know more guys like us, too, and learn from everyone else. Two-way deal.

Connecting the Wood Flooring Industry

The guys who participate on these trips – it’s been almost all guys who have entered to win one of these lottery slots, though women are encouraged to
enter, too – leave Germany and scatter across the country again, often with plans to reconnect at industry meetups like the NWFA Wood Flooring Expo.

They connect on social media and end up tapping each other’s brains as resources to help solve issues they run into on the job site. Give and take.

In short, Fly and Sand is an irreplaceable five days that offers lasting benefits beyond Lägler sanding machines and certification training.

Of course, those machines, that history, the way they are built, and the way they get used is at the heart of the time spent at the factory and in the
training facility during Fly and Sand. But it’s only part of why Lägler offers Fly and Sand.

Why Does Lägler Offer Fly + Sand?

If you try to ballpark the numbers on what a trip like this costs for 10 people per Fly and Sand you can figure out it’s not cheap. So why does Lägler
do it?

Why does Lägler pay for the group to fly to and from North America, set up everyone in individual guest house rooms, buy the meals, pay for entrance into
super-cool places like the Mercedes-Benz Museum, make sure transportation is Johnny-on-the-spot for every stop – e.g. Heidelberg Castle, dinner each
evening?

Why does Lägler give a tour of its factory, where every one of its iconic machines, including the HUMMEL®, TRIO and FLIP®,
are hand-built? And why does the company provide its Premium Sanding Technology (PST®) certification at no charge?

It’s simple. Belief in Lägler quality, and belief in the contractors who know their craft, and are able to sort out the what’s-what about the machines
they use day in and out on the job.

Lägler handles its part – engineering, manufacturing, training – and leaves it to those who participate in Fly and Sand to see it all first-hand at the
source in Germany, and make up their own minds. (The same goes for participation in PST, available year-round with us in Denver, and in the U.K.) We know that
if you believe in Lägler like we do, you’ll tell others. And your word carries weight throughout the industry like no manufacturer’s can.

If you’re part of Fly and Sand, you get to learn more about where the machines come from. You get to see the care that is put into them by long-standing
experts in their production roles, and you can know by first name.

For example, Sergei likely put together your HUMMEL, if it was made in this century, and Andreas likely is who tested it. Thorsten probably powder coated
your HUMMEL hammer tone olive green, if bought in the past more than a decade. Several others had roles from parts fabrication to assembly to packing
and shipping.

Lägler machines are produced start to finish in one location, with few parts fabrication exceptions that are made by partners located nearby.

Of course, Karl Lägler, the son of the company’s founder, who also was the man behind the HUMMEL, knows the machines and their uses in every detail. And
he is very involved in each Fly and Sand group’s experience. From picking you up at the airport in Frankfurt to the handing out of PST certificates
and the last auf wiedersehen before the group returns to North America.

No Catch + No Sales Pitch

With each Fly and Sand, the process includes making phone calls to the lottery winners to let them know their names came up on top. Sometimes those phone
calls are met with skepticism. “For real? What’s the catch?”

We’ve heard from guys on the trip how they kept waiting for a sales pitch, as if they were on a “free” trip to Disney World and expected to get stuck in
a time-share sales-pitch hell as payment for the vacation. Not gonna happen.

There is no catch. There is no sales pitch.

So, why does Lägler offer Fly and Sand? Because we trust in the quality, engineering and endless research and refinements that go into the machines
and the PST training. (We welcome your suggestions for improvements, too.)

And we trust those of you who make your living using the machines to know the differences between a champion and a pretender.

By the way, we’re swinging big again next year. Two Fly and Sand lotteries. You’ll be hearing about it by early in 2017 on our Instagram,
Facebook and Twitter pages, and via our monthly
email newsletter.

See more photos from this year’s trips in our Facebook photos. You probably will recognize
some of the people included.

Related Blog Posts

Inside Look: @clevelandwoodbee on Fly + Sand

Lägler Certification: What Is PST?

[Video] The Craftsmen Who Hand Build the Iconic HUMMEL

https://www.laglernorthamerica.com/wp-content/uploads/2020/02/Fly-Sand-Title.jpg 600 1200 webmaster https://www.laglernorthamerica.com/wp-content/uploads/2020/02/logo2-300x90.png webmaster2016-10-19 18:42:392020-02-29 18:46:09Fly + Sand: Who, What, Why?

How to Use the Lägler FLIP Corner Attachment

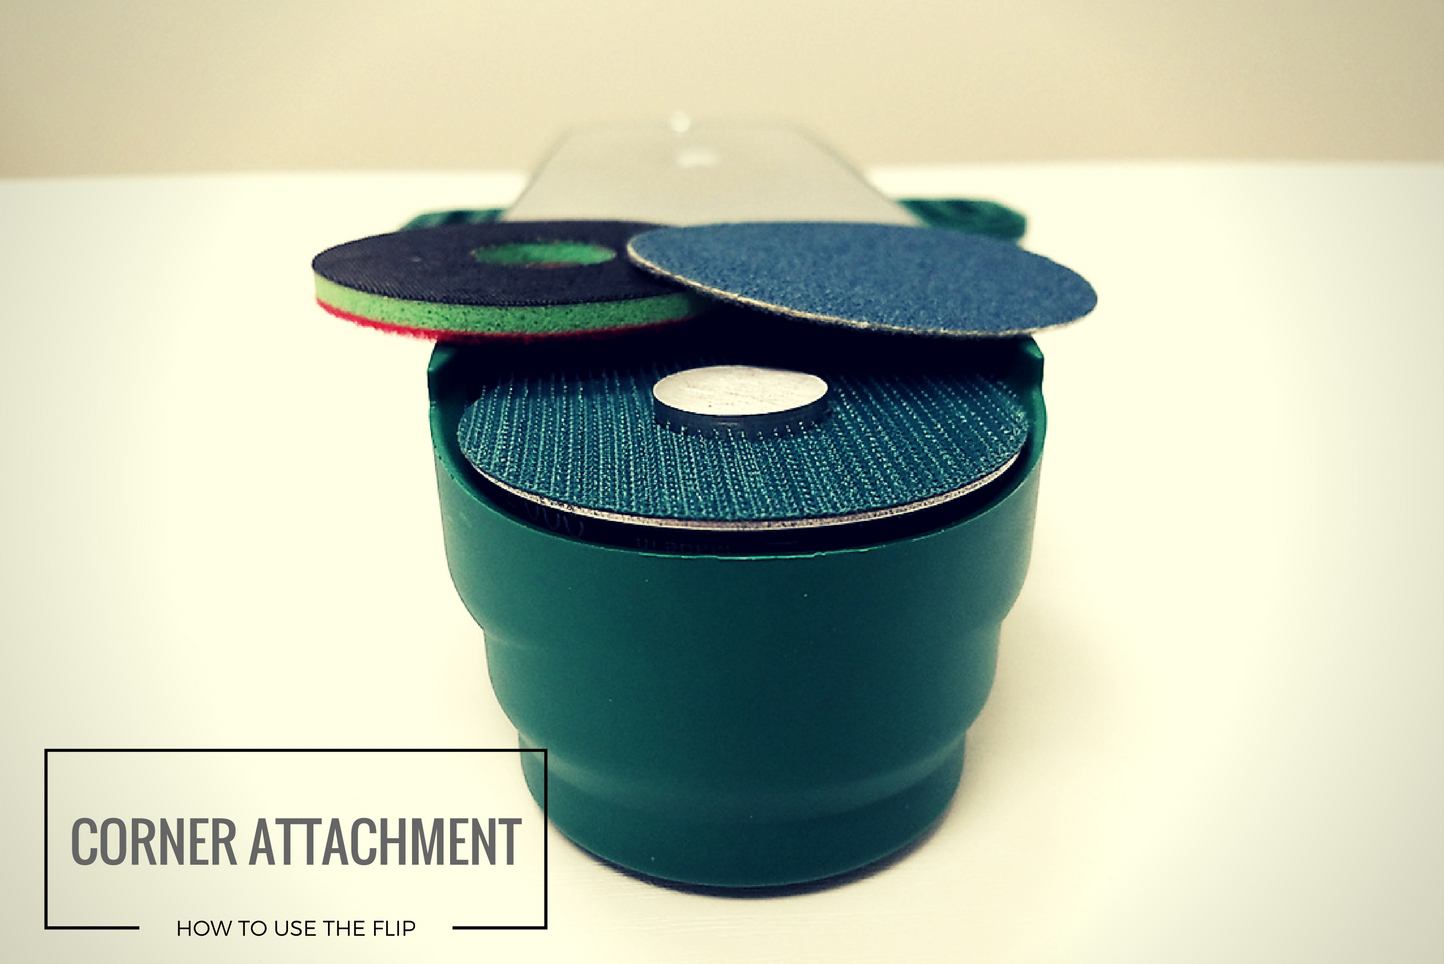
Flexibility of tools on the job stands out. And the Lägler FLIP, with its corner attachment, can be one of the difference-makers on the job site.

If you use a FLIP, you know the short attachment well, and maybe the long one. You run the FLIP clockwise with those, following the machine’s designed
rotation (arrow on top of the attachment reminds you the disc is turning to the right). With the short and long attachments, you can cover the edges
of rooms, get under cabinets and radiators, and handle stairs.

But how do you handle small or narrow spots, like around pipes, or between spindles/balusters of a railing on stairs, or the corners? Do you scrape? Sand
by hand?

The corner attachment is designed to help you knock out those tight spots with ease and speed. (Watch a quick video example of the FLIP being used between the spindles from Rende Flooring’s @callmetito on Instagram.)

In fact, with its smaller 2 3/8” (60 mm) sanding plate diameter, the FLIP’s rotation cranks at a speed that makes it even more aggressive than its larger
counterparts, making corners quick-hit work. The disc diameter for the short and long attachments is more than
double the size at almost 6″ (150 mm). The RPM when using the corner attachment is 9,300 compared to 3,720 RPM when using the short or long attachments.

Because of that, this is the number one tip for using the FLIP corner attachment to take away from this blog post: Sand counter-clockwise.

That will help you to control the hyper-aggression that naturally comes with a smaller disc’s rotation speed, and reduce the heat that speed and increased
friction cause.

But there is more we recommend you keep in mind.

3 More Things to Know When Using the FLIP Corner Attachment

> Set the FLIP’s wheels at the same position as when using the short attachment

> Use a flexible foam hook-and-loop donut between the sanding plate and the abrasive

> Use the finest grit the situation allows

When changing the abrasive, if the disc and donut on the machine are hot after use, let them cool before pulling the abrasive off the donut. Otherwise,
pulling on the abrasive can lead to the foam donut separating and needing to be replaced.

Bonus tip: Have a spare donut setup with the next grit you need ready to go. That way, you can pull the used abrasive and donut off the
sanding plate as one piece, and set it to the side to cool before removing the disc from the donut. With your new abrasive disc already set to go on
your second donut, you’re ready to put it on the corner attachment and keep on moving.

Related FLIP Parts

Corner Attachment, Complete: P1253 from
Lägler North America; 335.01.00.100 (Global manufacturer number)

“Foam Donut”/Flexible Velcro Ring, Corner: P1262;
335.02.13.105

Abrasives for FLIP Corner Attachment: CFLIP40,
CFLIP60, CFLIP80,
CFLIP100

Related Blog Posts

How to Adjust Lägler FLIP Sanding Pressure

How to Replace Lägler FLIP Carbon Brushes

How to Remove the Lägler HUMMEL Motor

https://www.laglernorthamerica.com/wp-content/uploads/2020/02/FLIP-CornerAttachment-HED.jpg 964 1444 webmaster https://www.laglernorthamerica.com/wp-content/uploads/2020/02/logo2-300x90.png webmaster2016-10-05 18:46:332020-02-29 18:48:35How to Use the Lägler FLIP Corner Attachment

Lägler TRIO: Sanding Disc Arrows + Abrasives

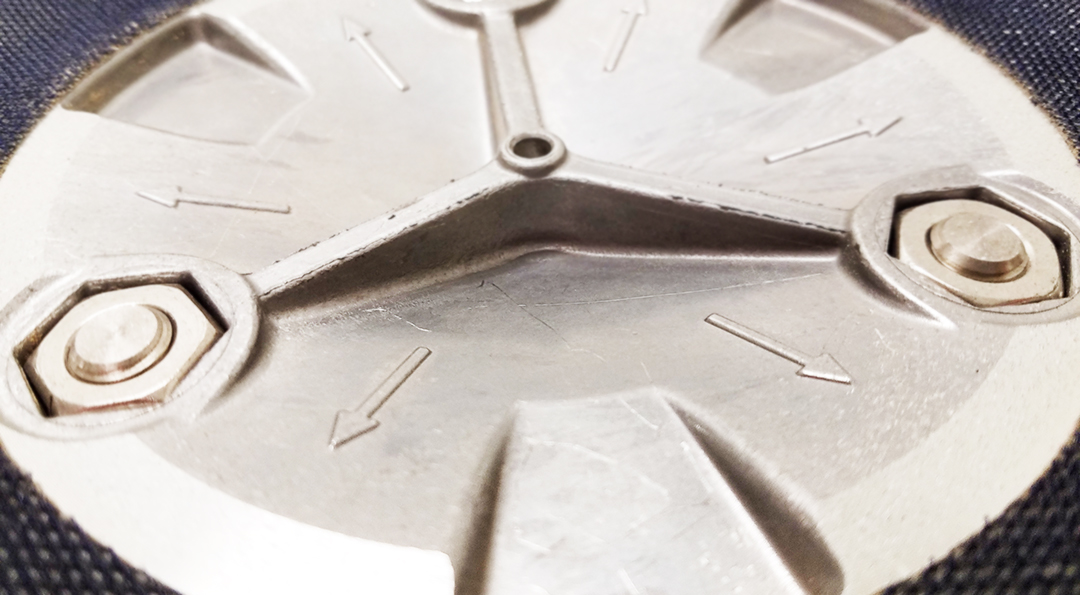
Have you noticed the six arrows on the bottom of a Lägler TRIO sanding disc?

We point them out during our Premium Sanding Technology training (PST® certification). A lot of times, the guys hadn’t noticed
them before. The arrows are subtle and built into the aluminum disc, but they have a purpose.

Look and feel around the outer surface of the sanding disc, noticing the alternating solid and hollow sections under the hook-and-loop backing ring. Where
the arrows point are the solid sections, the six areas of the sanding disc that make contact with the sanding surface.

#LaglerTip > Extend the life of abrasives when using the TRIO: When the paper is worn, pull it off and turn it slightly to line up the unworn parts of the paper with the arrows/solid sections of the disc, and refasten to continue sanding.

TRIO Sanding Disc Innovations

We recently talked about Lägler’s quality-or-nothing approach on this blog (Read: “4 Reasons Not to Use a Wire-Brush Sanding Drum with a HUMMEL”).

That means when a machine concept is new – for example the HUMMEL in ’69 and the TRIO in ’93 – it rolls out the gate ready for the long haul.

Lägler innovations to its existing machines are small refinements that might often go unnoticed, because the core product was slowly developed to be on
point before anyone in the field got their hands on it.

With the TRIO, one of those small improvements was with the sanding disc. Originally, the disc was a solid plastic plate. A few years after the TRIO’s
release, the aluminum disc was produced with its alternating solid and hollow sections. That change enables more aggressive cutting.

TRIO sanding disc with foam ring/donut (red, green and black), topped by sand paper.

Sanding with the Lägler TRIO: Hard Plate ­+ Donut

The recommended standard hook-and-loop sanding setup with the TRIO builds from the sanding disc surface like this: self-adhesive backing ring, foam ring/donut,
and then the abrasive.

A common-enough mistake is to sand with only the self-adhesive backing ring. That won’t help the floor or your machine. Remember to put the abrasive on
before sanding.

Hard plating takes the foam donut out from between the backing ring and the sand paper. That gives you around 10 percent more aggressive cutting for exceptionally
uneven flooring. But we recommend using the foam donut.

Screening with the Lägler TRIO

When screening, remember to take off the foam ring. If you don’t, it will cause unnecessary wear on the ring, and you’ll need to replace it sooner than
expected.

#LaglerTip > Always screen with the same grit as the last sand paper used.

The standard setup for screening is to use a maroon pad between the backing ring on the disc and the screen. Make sure to use the plastic white pin to
hold on the screen. The pins are sold individually. When buying a set for the TRIO, remember to order three.

Related Blog Posts

How to Clean the TRIO Filter

How to Change the TRIO Tooth Belt

How to Dismantle + Reassemble the TRIO Filter Unit

Related Lägler Parts

Self-Adhesive Backing Ring: P955 from Lägler North America; 900.02.12.305 (Global manufacturer number)

Foam Ring: P954; 900.02.13.205

Sanding Disc Complete / Universal Disc: P953: 900.02.10.200

Plastic Screen Pin: P950; 900.02.23.205

https://www.laglernorthamerica.com/wp-content/uploads/2020/02/TRIOarrows.jpg 595 1080 webmaster https://www.laglernorthamerica.com/wp-content/uploads/2020/02/logo2-300x90.png webmaster2016-09-21 18:49:192020-02-29 18:51:19Lägler TRIO: Sanding Disc Arrows + Abrasives

How To Remove the Lägler HUMMEL Motor

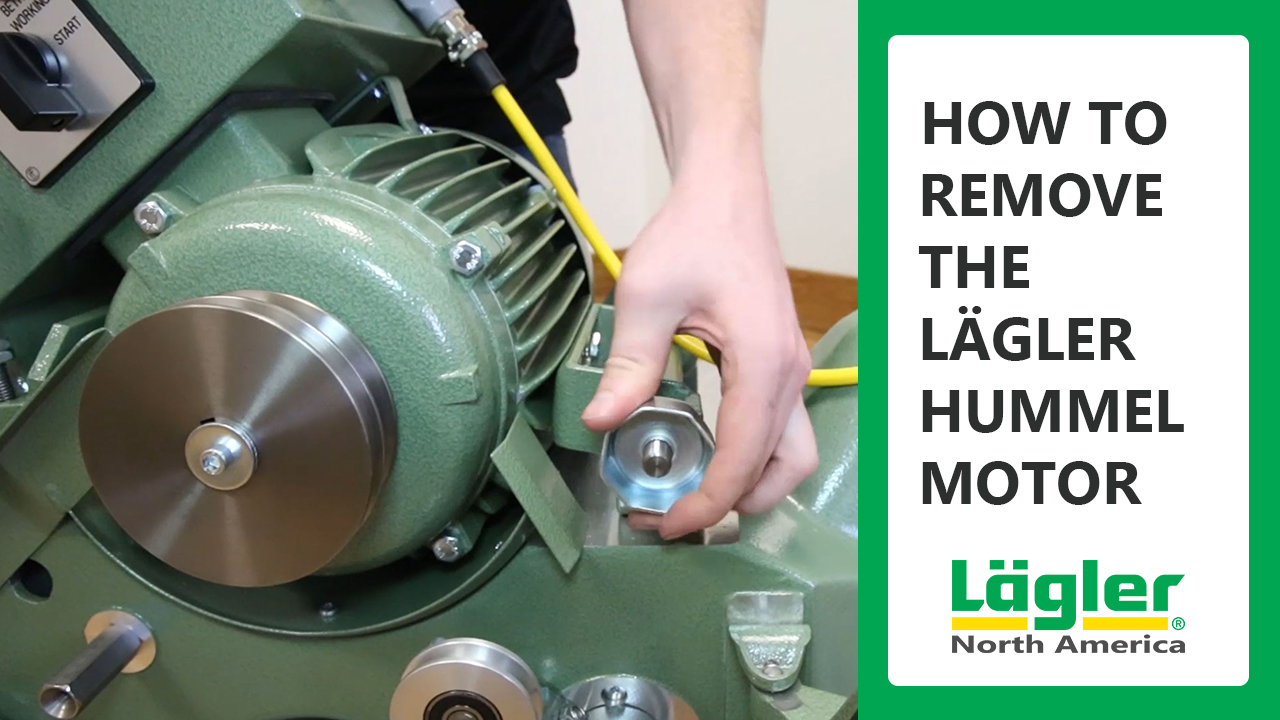
The Lägler HUMMEL weighs about 175 pounds. That weight is important for sanding wood floors with the HUMMEL, but it’s no doubt tough on your back when
carrying the machine for long.

Any of you who have worked a multi-story job alone and have lifted it up a flight or two of stairs without taking off the motor know what I’m talking about.

Here are simple instructions, as shown in the short how-to video below and on our Lägler North America YouTube channel, to separate the HUMMEL motor from its chassis to make much lighter
work of carrying the machine.

Tools Needed to Remove the HUMMEL Motor

The tools you might need are:

  • Box wrench (LNA #P232 | Mfr. #100.00.45.105) or channel lock pliers
  • 6 mm hex wrench
  • 17 mm crescent wrench

Easy Step-by-Step Instructions for Removing the HUMMEL Motor

Step 1: Make sure the sanding drum of the HUMMEL is raised off the floor and that the machine is turned off and unplugged.

Step 2: Open the belt guard by loosening its screw, using a 6 mm hex wrench, if needed, and swinging the guard out of the way.

Step 3: Release the tension in the drive V-belts by loosening the eye bolt. Use a 17 mm wrench, if needed, to initially loosen the bolt.

Step 4: Remove the drive belts from both pulleys.

Step 5: Disconnect the kill-switch cord.

Step 6: Loosen the two motor nuts enough to allow you to pull the motor off the HUMMEL chassis. Do not completely remove the motor nuts.

To re-attach the motor to the HUMMEL, perform the steps listed above in reverse order.

When replacing and re-tensioning the drive belts, the trick is to tighten the eye bolt until there is one-quarter inch of flex in the belts. Don’t just
screw the eye bolt down to the exact same spot it was in prior to removing the motor.

Related Blog Posts

How to Replace the HUMMEL Sanding Drum

Why to Sand at Angles + Right to Left with the HUMMEL

Stay current with Lägler North America. Sign up for our monthly email newsletter.


https://www.laglernorthamerica.com/wp-content/uploads/2020/02/titleslide.JPG 720 1280 webmaster https://www.laglernorthamerica.com/wp-content/uploads/2020/02/logo2-300x90.png webmaster2016-09-07 18:51:492020-02-29 18:53:34How To Remove the Lägler HUMMEL Motor

Inside Look: @Clevelandwoodbee on Fly + Sand

Editor’s Note: Brandon Santiago, of Cleveland Hardwood Restoration, was one of 10 wood flooring professionals whose names were drawn as winners of this year’s annual Lägler Fly and Sand lottery. Below, is Brandon’s take on the once-in-a-lifetime experience. All photos shown are courtesy of Brandon, and come from his Instagram account (@clevelandwoodbee).


By Brandon Santiago, Cleveland Hardwood Restoration

Those of you who follow me on Instagram saw that I recently visited Germany to attend Lägler PST training. If you’re in the wood flooring business, and
you don’t know what that is, you should.

PST training is based on Lägler’s Premium Sanding Technology.
It’s designed to help wood flooring geeks like me become more efficient and consistent with my sanding skills, which will have a huge impact on my
bottom line.

“I’m not ashamed to admit that walking into the factory for the first time was an emotional experience.” ~ Brandon Santiago, Cleveland Hardwood Restoration

Lägler hosts this training in Denver, in the U.K., and in Germany, but I was part of a lucky group that got to attend the training in Germany. And Lägler
picked up the tab. Mind-blowing, right?

The sight-seeing we did was great, as was the German beer and food, but the real highlight of the trip for me was touring the Lägler manufacturing facility
where the machines I use every day are made. I was so amped up about touring the plant that I couldn’t sleep the night before. Lots of other guys on
the trip couldn’t either.

I’m not ashamed to admit that walking into the factory for the first time was an emotional experience. These machines are engineering marvels, and seeing
for myself how they are made, made me appreciate them even more.

The people working at Lägler are true craftsmen, and you can see the pride they take in their work at every work station. In fact, being in the factory
was like being an eight-year-old visiting Disneyland for the first time. I couldn’t help but wander off from the group to explore on my own.

Seeing these machines lined up by the dozens was like Christmas, Easter and my birthday all wrapped up as one. And then to learn that the name Hummel means
“bumblebee”? It’s like it was meant to be.

One of the highlights of the tour for me came when Jeff Fairbanks, one of our trip hosts from Palo Duro,
gathered the factory crew and put me up on an assembly table to drop trou and show the German crew my big machine – the Hummel tattoo I proudly display
on my thigh. When Karl Lägler himself saw it, he laughed and promptly asked me, “Where is the TRIO”?

The one-day training and certification program was intensive. Marc Schulz with Lägler showed us all the ins and outs of each machine – the HUMMEL, SUPERHUMMEL,
TRIO, FLIP, ELAN and PROFIT. We got one-on-one instruction with each machine, we made our own wood filler, we sanded UV finishes, and we tried a variety
of finish methods.

It’s hard to explain, but being in that environment with so many other talented wood flooring craftsmen, with the smell of the wood dust and finish all
around us, it made us want to get to work and perfect our art.

Which is where I am now. Back at home, in Cleveland, implementing what I learned to improve my business, and leaving my mark on this world one floor at
a time.

https://www.laglernorthamerica.com/wp-content/uploads/2020/02/Cleveland-intro.jpg 1112 2310 webmaster https://www.laglernorthamerica.com/wp-content/uploads/2020/02/logo2-300x90.png webmaster2016-08-24 18:53:572020-02-29 18:56:58Inside Look: @Clevelandwoodbee on Fly + Sand

4 Reasons Not to Wire-Brush with a HUMMEL

If you know Lägler, you know it stands for quality.

You also probably know that if you stand for something, you’ve got to say “no” to something else. For Lägler, that means putting out quality products and
saying “no” to subpar products.

So, when we get asked about wire-brush sanding drums – Does Lägler make them? Can another company’s wire-brush drums be used with the HUMMEL? – our answers
are based on our love of quality.

No, Lägler does not manufacture wire-brushed sanding drums. Not anymore. We learned (see list below).

Yes, another company’s wire-brush drums can be used on the HUMMEL. But we recommend against using them with the HUMMEL.

We understand wire-brushed wood flooring is popular. We know that means there is money in it for whoever can produce that distressed floor look, whether
it’s the wood flooring manufacturer or a contractor with the hand-crafting skills.

We recommend not using a HUMMEL to achieve the wire-brushed look. Four reasons are:

  1. The HUMMEL operates at RPMs that are too high for that effect. It is too heavy and applies too much pressure on the wire-brush drum.
  2. When the steel wires bend, clump and break, the wire-brush drum ends up throwing the HUMMEL out of balance, damaging the drum shaft, the bearings and
    the fan unit. It causes chatter on the floor.
  3. When the wires are damaged, the drum also causes inconsistent patterns of brush marks in the floor. For example, clumped wires overdo it in spots while
    other places are not brushed at all.
  4. Floor edges can’t be reached with the HUMMEL. This leaves two options for finishing the wire-brushed look:

    a. Wire-brush by hand, which is time-consuming and expensive.

b. Use a different machine, which will create a different look than what the HUMMEL produced in the field. The second machine likely will operate with
a different RPM and pressure level.

Wire-brushed floors are popular for a reason. We get it. But we go all-in for the quality of our products, staying in our lane to be the best at what we
do. After all, there is a reason the HUMMEL is iconic in the wood flooring industry and so well-known across the globe.

Knowing the HUMMEL isn’t the right machine for wire-brushing work, we don’t pretend.

Sign Up > Lägler North America newsletter

Related Posts:

How to Replace a Lägler HUMMEL Sanding Drum

How to Remove the HUMMEL Motor for Lighter Carrying

https://www.laglernorthamerica.com/wp-content/uploads/2020/02/HUMMEL-WireBrush.png 595 1080 webmaster https://www.laglernorthamerica.com/wp-content/uploads/2020/02/logo2-300x90.png webmaster2016-08-10 18:57:232020-02-29 18:59:114 Reasons Not to Wire-Brush with a HUMMEL
Page 1 of 212

Recent Posts

  • NWFA Wood Talk Podcast – A Conversation with Russ Watts of Lägler North AmericaJune 30, 2022
  • July 26-28, 2022: Hosting the NWFA Intermediate Installation + CP TestingJanuary 4, 2022
  • CLASS FULL: August 23-25, 2022: Wadesboro Lägler + Loba Wakol Prep, Sand, & Finish CourseJanuary 4, 2022
  • September 20-22, 2022: Bowling Green Hands-On Training with Basic CoatingsJanuary 4, 2022
  • October 20-21, 2022: Denver Two-Day Basic Sand & Finish with Basic CoatingsJanuary 4, 2022
  • October 24-28, 2022: Denver Lägler Sanding + Berger-Seidle Advanced CourseJanuary 4, 2022
  • November 8-10, 2022: Hosting the NWFA- Intermediate Sand & Finish + CP TestingJanuary 4, 2022
  • November 15-17, 2022: Bowling Green Hands-On Training with Basic CoatingsJanuary 4, 2022
  • December 14-16, 2022: Denver Lägler + Loba Wakol Prep, Sand, & Finish CourseJanuary 4, 2022
  • LNA VP Marc Schulz Featured on NWFA’s “Wood Talk” PodcastMay 14, 2021

Tags

Abrasives Contractor Education Featured Item Fly-and-Sand How-To How-To Video How to sand a wood floor Lagler Sanding Manual Lägler Certification Training Lägler FLIP Lägler History Lägler HUMMEL Lägler Parts Lägler TRIO Machine Maintenance Marketing Premium Sanding Premium Sanding Technology PST Sanding Drums Social Media Subfloor Prep

Archive

  • June 2022
  • January 2022
  • May 2021
  • August 2020
  • July 2019
  • December 2017
  • November 2017
  • October 2017
  • September 2017
  • August 2017
  • July 2017
  • June 2017
  • May 2017
  • April 2017
  • March 2017
  • February 2017
  • January 2017
  • December 2016
  • November 2016
  • October 2016
  • September 2016
  • August 2016
  • July 2016
  • June 2016
  • May 2016

Maximize jobsite efficiency. Boost your bottom line.

Earn Lägler Certification

Signup to look, listen + learn through the

Lägler N.A. Newsletter

About Lägler North America

Lägler North America, a division of Palo Duro Hardwoods, is the North American distributor of machines and parts manufactured by Eugen Lägler GmbH in Germany. We are North America’s machine repair center, and offer Lägler’s one-day Premium Sanding Technology (PST®) certification course.

Latest News

Lägler N.A. Is Social May 11, 2016

Lägler North America is building a community via its social pages. Connect with us on Instagram, Facebook, and Twitter to see photos and videos, to learn trade tips, hear about opportunities and more.  

Stay Informed

Click to download the latest Lägler Direkt Newsletter

Download

Copyright © 2020 Lägler North America. All Rights Reserved.

  • Terms & Conditions
  • Shipping & Return Policies
  • Privacy Policy

Scroll to top