• Facebook
  • Instagram
  • Mail
  • Youtube
Call 1-800-8-HUMMEL
  • 0Shopping Cart
Lägler North America
  • Machines
    • SURFACE
      • HUMMEL
      • SUPERHUMMEL
    • FINE SANDING
      • TRIO
      • SINGLE
    • EDGE/STAIRS/CORNER
      • FLIP
      • ELAN
      • UNICO
  • Machine Parts
    • HUMMEL
    • SUPERHUMMEL
    • TRIO
    • FLIP
    • ELAN
    • SINGLE
    • UNICO
  • ABRASIVES
    • Buy Abrasives
  • Blog
  • PST®
  • Newsletter
    • Lägler Direkt Archive
    • Subscribe | Email Newsletter
  • Warranty
  • Contact
    • Info Request Form
    • Submit Photo | #LaglerOfTheDay
  • News & Events
  • Fly & Sand 2021
  • Menu Menu
You are here: Home1 / Blog2 / Lagler Sanding Manual

Posts

Prevention of Sanding Marks

December 7, 2017/in Lägler /by webmaster

The last thing you want with a floor you’ve sanded and finished is to have sanding marks pop like neon signs in the night. If you can spot sanding marks
while standing at full height on the floor and looking only with ambient light, then something went wrong.

This final blog post that comes from Lägler’s “Sanding of Wooden Floors” manual (free download) lays out the reminders of how to avoid sanding marks ruining
your success on the job.

Tips to Prevent Sanding Marks

The wood flooring and expansion gaps or the staircases always should be thoroughly vacuumed immediately before each work step (every sanding step, gap
filling or surface treatment).

Here are some general tips to keep in mind:

  • The abrasive must be suitable for the respective machine and should not be damaged.
  • The abrasive must be correctly attached and fastened.
  • The wheels should not be soiled or damaged.
  • The V-belts should not be soiled, damaged or worn out.
  • The pulleys should not be soiled, damaged or worn out.
  • The machine operation must be uniform and adapted to the corresponding process.
  • The grit sequence must be followed.
 
Sanding Manual Free Online Download
Drum and Belt Sanding Machines
  • The sanding pressure setting must match the abrasive grit to be used.
  • The side wheels must be set so the sanding drum sands in the center.
  • The lowering rod must move freely and not jam.
  • The sanding drum should not be soiled or damaged.
  • The tension roller of the assembly should not be soiled or damaged.
  • The sanding drum must always be lifted from the floor before the machine is turned on or off.
  • The sanding path displacement always should proceed from left to right.
  • The displacement from one sanding path to the next should not be too far out.
  • The sanding direction must be selected to match the laying pattern of the wood flooring.
  • Excessive pressure should not be exerted on the sanding drum during sanding.
    • No additional weight should be placed on the machine.
    • The rear portion of the machine should not be lifted by the handle during sanding.
    • The lowering lever should not be pressed down during sanding.
    • As soon as it is determined that the subfloor or wood flooring tends to vibrate, the sanding steps must be executed as early as possible, using
      the three-disc sanding machine instead of a drum or belt sanding machine.
Edge Sanding Machines
  • The wheel setting must be adjusted to the respective attachment.
  • The two wheels must be set to an equal height.
  • The sanding plate should not be set too steep. Otherwise, digs can result.
  • The sanding plates overlay must not be damaged.
  • The abrasive must be firmly positioned in the center of the sanding plate.
  • The machine always must be tipped slightly back so that the abrasive is lifted off the floor before it is switched on or off.
  • The machine must always be guided with circular movements during sanding.
  • Excessive pressure should not be applied to the attachment during sanding.
  • To increase the abrasion of the machine, change the angle by adjusting the wheels.
Three-Disc Sanding Machine
  • The abrasives must be firmly positioned in the center of each sanding plate.
  • The three sanding plates must be identically equipped.
  • The sanding plates must be correctly installed and attached.
  • The flexible Velcro rings should not be damaged.
  • The flexible Velcro rings must be used with abrasives coarser than 60 grit.
 
Meet the Icon Builders, the Men Who Hand-Build the HUMMEL

Visible Sanding Marks After Surface Treatment

Brightness differences:

The finish coat was accidentally sanded through at certain spots during the intermediate finishing sanding, which later leads to differences in the brightness
on the completed finished surface.

An abrasive with a different grit and cutting material was used for the edge sanding as for the previous field sanding.

Cloud formation:

Glossy spots can be seen on the surface (cloud formation). The same abrasive was used for too long in the last sanding step that it became too blunt. Excessively
blunt abrasives burnish the wood surface.

The wood absorbs less finish on burnished spots. This causes differences in the brightness.

The abrasive must be changed frequently enough to prevent burnished spots.

Visible sanding marks:

The final sanding step was performed with an excessively coarse grit. Oiling requires finer sanding than finishing.

For the full rundown of how to get the most out of your sanding machines, especially if they are Lägler machines, read each post on this blog.

Or, better yet, download Lägler’s free PDF, print it out, carry it on your phone,
whatever will help you and your crew be the best you can be.

Hands-on training and instruction are available through Lägler’s one-day Premium Sanding Technology (PST®) certification course, too. Call 800-848-6635 to schedule your session in Denver.

Related Blog Posts

How to Minimize Sanding Efforts + Maximize Business Profits

Big Machine Sanding Direction, Speed + Pressure

Abrasives: Cost vs Value of Quality

https://www.laglernorthamerica.com/wp-content/uploads/2020/02/Prevent-Sanding-Marks.jpg 422 750 webmaster https://www.laglernorthamerica.com/wp-content/uploads/2020/02/logo2-300x90.png webmaster2017-12-07 00:43:332020-02-26 00:49:54Prevention of Sanding Marks

How to Use a Lägler TRIO

September 26, 2017/in Lägler /by webmaster

Those who don’t know call the Lägler TRIO a buffer. Only those who don’t know.

The way to feel what’s what is to get your hands on the TRIO and do some work – and to make sure you’re using it the right way.

That comes with getting some practice laps at the source: Lägler’s Premium Sanding Technology (PST®) certification training.

Next best? Read what’s below. It’s based on Lägler’s “Sanding of Wooden Floors” manual (download free PDF).

How Best to Use the Lägler TRIO

The TRIO is designed with two functional advantages:

  • Produce a flatter surface than a belt sander when using the same grit abrasives
  • Sand in any direction, from wall to wall

Fine sanding using the TRIO generally begins with hook-and-loop sanding discs starting at 60 grit. You can sand with the TRIO up to 150 grit, depending
on the wood species and the subsequent surface treatment.

If you want to take it one step further, use sanding screens after the final sanding step. Use screens at the same grit as the sanding disc used in the
final sanding step.

One difference between the TRIO, the industry’s original multidisc sander, and a buffer is it packs the power for pre-sanding, too. You can use 40 grit
to smooth out minor over- and under-wood.

Sand with a Lagler TRIO in Any Direction

Fine Sanding with the Lägler TRIO

To create high-quality surfaces when using the TRIO for fine sanding:

  • Do not skip more than one grit number when pre-sanding with a belt sander
  • Do not skip any grit numbers when fine sanding with the TRIO

If you want less aggressive cutting with the TRIO:

  • Remove the additional weight
  • Attach two flexible Velcro rings to each sanding plate

These methods especially give you an advantage when sanding uneven engineered flooring, helping to prevent the top layer from being sanded through.

To increase sanding abrasion with the TRIO:

  • Remove the Velcro rings from the TRIO sanding plates
  • Decrease walking speed while sanding

Warning: Excessively slow walking speeds or continuous sanding in the same spot creates too much heat. That can cause burn marks on the wood flooring and
clogging of the abrasive. If a spot requires extra sanding, make sure to repeat sanding at appropriate time intervals.

The wood species and the surface treatment to be carried out after the fine sanding determines the grit number of the final sanding step.

Intermediate Finish Sanding with the Lägler TRIO

The TRIO can be used for intermediate finish sanding with sanding screens.

The application of a used sanding screen and the removal of the additional weight is recommended to reduce the risk of sanding through the finish layer
during intermediate finish sanding.

Sanding pads also can be used on the TRIO for the intermediate finish layer.

When sanding cork:

  • Never sand with abrasives coarser than 60 grit
  • Always remove the additional weight from the TRIO
  • Sand without the flexible Velcro ring on the sanding plates

Check surface quality and perform additional sanding steps depending on the result.

Last note: Clean the filter cartridge regularly.

Adding the TRIO to your roster of equipment is a next-level play. It’s for craftsmen who raise the bar for quality and give themselves the opportunity
to command a next-level place in their market.

We know it takes real commitment to the investment. We welcome you and your crew to join us for a one-day Lägler PST training class. Test drive the TRIO
and get started the right way.

Related Blog Posts

How to Minimize Sanding Efforts + Maximize Business Profits

Big Machine Sanding Direction, Speed + Pressure

Abrasives: Cost vs Value of Quality

https://www.laglernorthamerica.com/wp-content/uploads/2020/02/HowUseTRIO-title.jpg 422 750 webmaster https://www.laglernorthamerica.com/wp-content/uploads/2020/02/logo2-300x90.png webmaster2017-09-26 01:00:322020-02-26 01:03:48How to Use a Lägler TRIO

Sanding With A Big Machine

August 15, 2017/in Lägler /by webmaster

A lot of floor sanding pros probably are confident in their “how to sand with a big machine” knowledge. Many of you should be. Yet here we are talking
about it, so hang with us …

We talk with flooring pros everyday about basic techniques and why they are the best way to go. In Lägler PST® training, when contractors and distributors
call us (800-8-HUMMEL, if you need it), at NWFA Expo,
answering questions via social media DMs – everywhere.

So, it’s worth double-checking your know-how and, at the least, you can send the new guy on your crew to this post and the many others we’ve put up on
the Lägler North America blog.

To help, here’s a list of the big machine blog articles we’ve posted in the past year:

  • How to Test Floor Flatness Using the Drum Lever
  • Big Machine Sanding Direction, Speed + Pressure
  • Big Machine Sanding Path Displacement
  • 6 Things You Need to Know About Sanding Drums
  • Sanding Drums: Lägler vs. After-Market
  • Leveling Your HUMMEL Wheels
  • Why To Sand at Angles + Left to Right
  • How to Remove the HUMMEL Motor
  • How to Replace A HUMMEL Sanding Drum
  • Four Reasons Not to Wire Brush with a HUMMEL

If you have a copy of the Lägler sanding manual,
that’s the good stuff we base blog posts like this one on.

http://www.laegler.com/en/downloads.html

Choosing the Starting Abrasive Grit

We know when you start a job and get the big machine on the floor, you’re ready to rip. But how do you decide what grit abrasive to start with?

That decision right there – what grit to start with – can make or break efficiency on the job. It can lead to spending more time and money than you want,
if you don’t nail it.

If you start with too coarse an abrasive, you’re cutting deeper scratches that will take more effort to remove. If you go too fine, you’re creating more
work for yourself to go over it again.

Q: How do you know what grit you to start with?

A: Test sanding

Make your best guess of what grit belt to put on the drum to start the test, but go as fine a grit as you think will work. If the first grit you try isn’t
the one, move to the next grit you think is best. Testing doesn’t take long to do, and not nearly as long as the alternatives. It will save you headaches.

Always sand with as coarse a grit as necessary and as fine a grit as possible.

Below are two images from the Lägler manual, “Sanding of Wooden Floors.”

The first one shows how to approach grit sequence when using a multi-disc sander in your lineup.

The second one shows grit sequence when using the conventional setup, that is without using a multi-disc machine.

Learn more about best methods for using a big machine, multi-disc sander and edger. Read the Lägler N.A. blog and subscribe to the Lägler N.A. monthly email newsletter.


How to Choose the Right Grit Abrasive When Sanding Wood Floors | Lagler North America Blog


How to Sand Wood Floors Using the Lagler Method | Lagler North America Blog

https://www.laglernorthamerica.com/wp-content/uploads/2020/02/SandingBigMachine.jpg 422 750 webmaster https://www.laglernorthamerica.com/wp-content/uploads/2020/02/logo2-300x90.png webmaster2017-08-15 04:37:562020-02-26 04:43:22Sanding With A Big Machine

How to Test Floor Flatness with a Big Machine

August 1, 2017/in Lägler /by webmaster

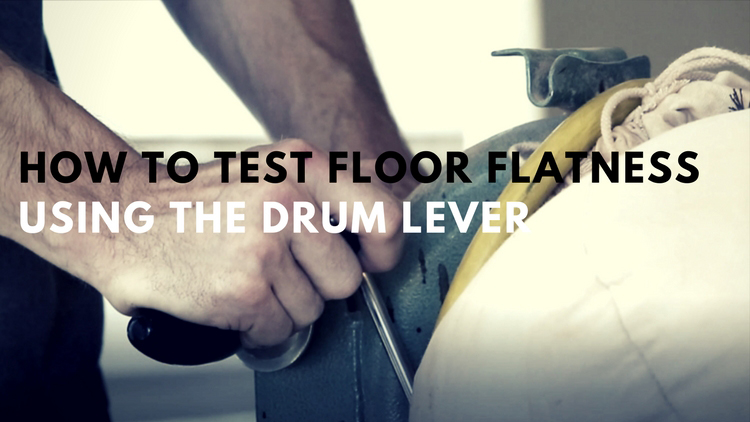
Besides getting awesome Instagram shots on the job, of course, getting the floor flat is the most important part of sanding wood floors.

But that’s harder to get just right if you don’t take a few minutes to figure out the flatness situation before you get started. You’ve got to know what’s
out of whack with the floor so you can game plan how to make it the level of flat you – and the homeowner — want.

We know you know the feel of unevenness when you’re sanding, and sometimes it’s easy enough to see. But taking some minutes to mark out the uneven spots
will make the job easier.

Here’s a simple flatness test you can do with your big machine, before you start sanding.

Watch the Lägler HUMMEL Icon Builders Video | Lägler North America Blog

Check Floor Flatness Using Your Drum Lever

Use these quick and easy steps to help you mark out high and low spots of uneven wood flooring. It will make those areas easier to see when you’re sanding.

1. Put a fine-grit, used abrasive belt on your drum.

2. Make sure your machine is turned off.

3. Lower the drum to the floor.

4. Roll the big machine at an angle across the boards, paying attention to the drum lever’s movement. If the lever moves up, the floor is rising. If it
moves down, the floor is sloping downward.

5. When the drum lever moves more than a little bit up or down, mark the area as high or low with a pencil.

If you do that to the whole room, you’ll be able to step back when you’re done marking out the spots and see the game plan laid out in front of you. High
here, low there. Low right over here, high over there.

These kinds of prep steps save you hassles later in the process. By doing everything you can to knock the floor flat upfront with your big machine, the
fine sanding steps will go much better. If not, the unevenness will continue through each step, making you have to work harder all the along the way.

Free Floor Sanding Manual from Lägler

Learn more about work-smart sanding techniques in Lägler’s “Sanding of Wooden Floors” manual. Download the full manual for free at laegler.com.

Want a chance to improve on a practice floor with Lägler at your side? Call us to set a date for you and your crew to get Lägler certified: 800-848-6635
(800-8-HUMMEL).

Learn more about Lägler Premium Sanding Technology (PST®) training on
our blog, too.

Related Blog Posts

How to Minimize Sanding Efforts + Maximize Business Profits

Big Machine Sanding Direction, Speed + Pressure

Abrasives: Cost vs Value of Quality

https://www.laglernorthamerica.com/wp-content/uploads/2020/02/TestFlatness-title.JPG 422 750 webmaster https://www.laglernorthamerica.com/wp-content/uploads/2020/02/logo2-300x90.png webmaster2017-08-01 23:51:172020-02-28 23:51:44How to Test Floor Flatness with a Big Machine

Big Machine Sanding Direction, Speed + Pressure

July 18, 2017/in Lägler /by webmaster

Sanding wood floors is a science. Knowing that science is what sets you apart from DIY homeowners who want to save a buck and try their luck.

In fact, when a lifestyle blogger reached out to us a few days ago wanting some tips for an article on “refurbishing” wood floors, this was our answer:
Hire a professional. Then we laid out some truth on what it takes to be good at sanding floors, how someone who is inexperienced is virtually certain
to jack up his/her floors. Hire. A. Professional.

That said, even pros aren’t gifted at birth with knowing the science it takes to perfect a floor. Learning is a process that never ends.

Free Lagler Floor Sanding Manual | Lagler North America Blog

For example …

1. We see photos on Instagram everyday showing people running big machines. Some are moving left to right across the room. Some are moving right to left.
Some run parallel to the straight-laid boards, and others cut at a slight angle across them.

Do you know … What’s the best way to sand a wood floor: moving from left or right, and parallel or at an angle? What might be exceptions to the rules?

2.Your big machine has variable pressure settings. For the Lägler HUMMEL, there are three – coarse, middle and fine – that can be chosen by use of a simple
lever. Other big machine models have their own adjustment mechanisms.

Do you know … Which big machine pressure setting should you use for what situation, and when?

3.Then there’s speed. How slow or fast you walk when using the big machine relates to the pressure setting and abrasive grit you’re using. How hard or
soft the species of wood you’re sanding has an impact, too.

Do you know … How fast (or slow) should you dance with your big machine? And what speed with what grit abrasives?

Sanding Direction: Left to Right vs. Right to Left

The HUMMEL’s eight-inch sanding drum is positioned at the right edge of the machine. The lateral wheel that trails the drum always rolls on the freshly
sanded surface.

Because the drum is on the right side of the HUMMEL, the left wheel runs on whatever surface – sanded or not yet sanded – the left side of the HUMMEL passes
over. Forward and backward.

Big Machine HUMMEL Floor Sanding Angle | Lagler North America Blog

By sanding left to right across the field of the room, all wheels of the HUMMEL will run on the same sanded surface. The machine will be level and you’ll
get optimal flatness as a result, avoiding waves. This benefit carries out in a domino effect for each sanding step in the process.

The exception to the rule is in tight or awkward spaces where common sense tells you to throw a change-up.

Big Machine Sanding Angle

If you sand with the direction of straight-laid floor boards, you are maintaining what has happened to that floor over time. You’re giving it a new look,
no doubt. But the flatness …

When you sand at an angle, you are:

  • Cutting across imperfections from floor movement, damage and neglect
  • Avoiding the vibration of loose boards that cause chatter
  • Avoiding waves rolling down the length of the boards

Until recently, Lägler recommended in its sanding manual to sand at an angle except for the final pass.

When sanding at an angle, at first, the scratch pattern will be more noticeable than when you cut with the direction of the floor boards. But as you sand
with increasingly finer grits and, especially, if you use a quality multi-disc sander in the process, you will remove those scratches.

Lägler now recommends to sand at an angle for all passes with the big machine.

The exception to this rule is when dealing with cupped boards of a straight-laid floor. On the first run across the floor, knock those
edges down with a head-on attack. Then go to sanding at a slight angle.

Adjusting Big Machine Sanding Pressure

Sanding pressures with the big machine are tied to abrasive grits. The finer the grit, the less drum pressure you should use.

The wood species matters, too. Softer woods should be sanded with less pressure, so not to cut too deeply into the floor.

Lagler HUMMEL Sanding Pressure Settings | Lagler North America Blog

The chart above, from Lägler’s “Sanding of Wooden Floors” manual, lays out grits related to pressure settings. Clear cut. Common sense.

When you have an extra-rough floor or one that’s damaged or coated with a hundred years of nasty, get mean with that first run. If you’re using 16 grit,
you know it makes sense to put on the coarse drum pressure to make the most of it.

Big Machine Walking Speed

To minimize sanding marks and save time in the process, pace yourself. Not too fast, not too slow. No matter how many years you have at the lever, this
relationship has to move at a steady pace. Keep in mind the grit and drum pressure. Overall, consistency is king.

For softer species, a little quicker walking speed will keep you from cutting too deeply into the floor. Or maybe it’s just that you need a slower speed
for harder species. You’re the pro on the job. If you’re getting worse scratches than you want, change the music you’re groovin’ to and adjust your
dance moves.

HUMMEL Floor Sanding Instructions on Walking Speed | Lagler North America Blog

Learn more about the fine details of floor sanding craftsmanship. Participate in Lägler’s one-day Premium Sanding Technology (PST®) certification course.

And download the Lägler “Sanding of Wooden Floors” manual online. It’s free.

Related Blog Posts

How to Minimize Sanding Efforts + Maximize Business Profits

How to Subfloor Prep with a Multi-Disc Sander or Buffer

Big Machine Sanding Path Displacement


https://www.laglernorthamerica.com/wp-content/uploads/2020/02/SandingdirectionSpeed-TITLE.jpg 422 750 webmaster https://www.laglernorthamerica.com/wp-content/uploads/2020/02/logo2-300x90.png webmaster2017-07-18 23:53:022020-02-29 00:05:56Big Machine Sanding Direction, Speed + Pressure

Abrasives: Cost Vs. Value of Quality

July 4, 2017/in Lägler /by webmaster

There are two approaches to floor sanding: guesswork and science.

Guesswork creates variables and challenges in sanding jobs that aren’t there. It causes the professional to change his or her approach from job to job,
species to species, and floor pattern to pattern. It produces results that vary.

The science of sanding is a proven process a professional can learn and use on each job, regardless of species, board widths, and installation pattern.
It produces consistent, quality results.

Quality is everything, if you’re trying to build a strong business on good work. That goes for your skills, machines, customer service, abrasives and the
other details. If you’re off-target in just one of those key areas, word on the street will bite you in the dust bag, whether you know it or not.

We talk about training and boosting your skills often on this blog, especially about Lägler’s Premium Sanding Technology (PST) class. Of course, we get into machine quality every day, too, talking about the standards Lägler holds itself to or just by posting photos of
Lägler’s craftsmen on Instagram quietly going about the business of hand-building and testing its machines.

It’s time to talk more about the ripple effect of choosing quality, especially with abrasives.

Free Online Download -- Lägler Sanding Manual

Cost vs. Value of Quality

Quality abrasives play a super-important role. Like with anything, you get what you pay for. Pay for cheap products, get cheap results.

You probably tell homeowners that. And you often see the problems caused by hacks, right? A homeowner calls you in to fix the disaster a “professional”
made of their floor. It was the low bidder they’d hired for the initial job, focusing only on the short-term pain of the money they were spending.
Now they are losing sleep, stressing the expense and headaches of the shoddy work they got from the contractor from hell.

They are painfully figuring out they’ve got to pay you what they should have stepped up to pay in the first place, just to fix the mess. That’s on top
of the money they already spent and the worry it caused them. Cheap quickly turned into way more expensive.

The same goes for any business that relies on quality ingredients to put out quality products or services it sells. A restaurant that goes cheap to save
a buck is short-sighted. It loses business in the long run because it’s worried about the cost of, say, a case of burger patties. The owner of that
restaurant probably isn’t connecting bad Yelp reviews to one purchase like which meat to buy.

But it isn’t just the meat. It’s the domino effect of that mindset that leads to going cheap on one thing after another. That restaurant owner doesn’t
invest in the other ingredients, either. Or replace the dirty or torn seats in the joint, or keep its restrooms clean, or care all that much when a
jaded employee doesn’t give customers a hello or smile or quality experience. Downward spiral.

For a true flooring pro – a craftsman – pride in quality work is at the top of the list. The good kind of word on the street makes the rounds and builds
the business like it’s got its own motor. Do good work, get good work.

Floor Sanding Abrasives: Cost vs. Value Quality

Floor Sanding Abrasives: The Nitty Gritty

The materials used in making abrasives affect sanding rates and how many square feet of life a professional gets out of them. Inexpensively produced abrasives
have shorter service life and need more frequent changing. The minerals used in inexpensive abrasives do not perform as aggressively, leading to more
time spent in the sanding process.

In the end, the additional costs of buying, storing, and transporting a larger quantity of lower-quality abrasives, plus having to spend more time sanding
with them makes investing in quality upfront a better value. (Sounds like that thrifty homeowner in the example above, right?)

In fact, the science of sanding means little without using the right abrasives for the right situations. A highly skilled race-car driver who has a fine-tuned
car can do little with it if the wrong tires are on it.

For wood floor sanding abrasives, the minerals, underlayment and adhesive are difference-makers. The types of underlayment (paper or cloth) and minerals
(silicon carbide, ceramic, aluminum oxide, and zirconia) needed depend on the intended use.

Grit Sequence for Success

Grit sequence is a key factor in the floor sanding process. It’s essential to follow the steps, like shifting properly through a race car’s gears. The
driver doesn’t get ahead by skipping gears. Instead, he bogs down his momentum.

Unlike in a car, proper grit sequence allows for skipping one grit, but only one. If a professional jumps two or more grits in the sequence, the scratches
from the previous grit will not be adequately removed. It will cost more effort, time, and abrasives to redo the work.

The first sanding step should be done with as coarse a grit as necessary, but as fine a grit as possible. That’s where the variable enters this science
of sanding. The professional must use his experience to recognize if a floor’s condition calls for an especially coarse grit to start.

For example, if it shows severe cupping or is coated with thick lacquer. The starting grit will help to determine the ending grit to be used. Everything
in between follows the steps of the process.

The science of sanding can be learned. A sanding professional can bank on its predictable, craftsman-quality results. No guesswork needed. Clients might
think it’s magic. It’s OK to leave them guessing.

The Bottom Line

Quality customers know when they are dealing with quality professionals. When they hire someone to sand and refinish their floor, they are investing a
good chunk into their home. They want to feel great about that. They want to know what they get back for their trust in you will be worth a grit when
the job is done.

Choosing quality is everything.

Learn more about the best ways to boost your floor sanding game. Learn it from Karl Lägler, the man who wrote the book on that game, by downloading the
free “Sanding of Wooden Floors” manual online from Lägler.

Related Blog Posts

How to Minimize Sanding Efforts + Maximize Business Profits

How to Subfloor Prep with a Multi-Disc Sander or Buffer

Big Machine Sanding Path Displacement

https://www.laglernorthamerica.com/wp-content/uploads/2020/02/Abrasives-Cost-vs-Value.jpg 422 750 webmaster https://www.laglernorthamerica.com/wp-content/uploads/2020/02/logo2-300x90.png webmaster2017-07-04 00:08:002020-02-29 00:12:29Abrasives: Cost Vs. Value of Quality

Recent Posts

  • November 16 – 20: Lägler and Loba-Wakol Essential Systems Course, DenverAugust 21, 2020
  • Versatility and Team GreenAugust 18, 2020
  • Precision and Team GreenAugust 18, 2020
  • Durability and Team GreenAugust 18, 2020
  • Tradition and Team GreenAugust 18, 2020
  • The Versatility of LÄGLERAugust 12, 2020
  • The Precision of LÄGLERAugust 12, 2020
  • The Durability of LÄGLERAugust 12, 2020
  • The Tradition of LÄGLERAugust 11, 2020
  • October 19 – 23: Lägler and Loba-Wakol Essential Systems Course North CarolinaAugust 11, 2020

Tags

Abrasives Contractor Education Featured Item Fly-and-Sand How-To How-To Video How to sand a wood floor Lagler Sanding Manual Lägler Certification Training Lägler FLIP Lägler History Lägler HUMMEL Lägler Parts Lägler TRIO Machine Maintenance Marketing Premium Sanding Premium Sanding Technology PST Sanding Drums Social Media Subfloor Prep

Archive

  • August 2020
  • July 2020
  • July 2019
  • December 2017
  • November 2017
  • October 2017
  • September 2017
  • August 2017
  • July 2017
  • June 2017
  • May 2017
  • April 2017
  • March 2017
  • February 2017
  • January 2017
  • December 2016
  • November 2016
  • October 2016
  • September 2016
  • August 2016
  • July 2016
  • June 2016
  • May 2016

Maximize jobsite efficiency. Boost your bottom line.

Earn Lägler Certification

Signup to look, listen + learn through the

Lägler N.A. Newsletter

About Lägler North America

Lägler North America, a division of Palo Duro Hardwoods, is the North American distributor of machines and parts manufactured by Eugen Lägler GmbH in Germany. We are North America’s machine repair center, and offer Lägler’s one-day Premium Sanding Technology (PST®) certification course.

Latest News

Lägler N.A. Is Social May 11, 2016

Lägler North America is building a community via its social pages. Connect with us on Instagram, Facebook, and Twitter to see photos and videos, to learn trade tips, hear about opportunities and more.  

Stay Informed

Click to download the latest Lägler Direkt Newsletter

Download

Copyright © 2020 Lägler North America. All Rights Reserved.

  • Terms & Conditions
  • Shipping & Return Policies
  • Privacy Policy

Scroll to top