• Facebook
  • Instagram
  • Mail
  • Youtube
Call 1-800-8-HUMMEL
  • 0Shopping Cart
Lägler North America
  • Machines
    • SURFACE
      • HUMMEL
      • SUPERHUMMEL
    • FINE SANDING
      • TRIO
      • SINGLE
    • EDGE/STAIRS/CORNER
      • FLIP
      • ELAN
      • UNICO
  • Machine Parts
    • HUMMEL
    • SUPERHUMMEL
    • TRIO
    • FLIP
    • ELAN
    • SINGLE
    • UNICO
  • ABRASIVES
    • Buy Abrasives
  • Blog
  • PST®
  • Newsletter
    • Lägler Direkt Archive
    • Subscribe | Email Newsletter
  • Warranty
  • Contact
    • Info Request Form
    • Submit Photo | #LaglerOfTheDay
  • News & Events
  • Fly & Sand 2021
  • Menu Menu
You are here: Home1 / Blog2 / Lägler Parts

Posts

Lägler Micro-Innovations Make the Difference

April 25, 2017/in Lägler /by webmaster

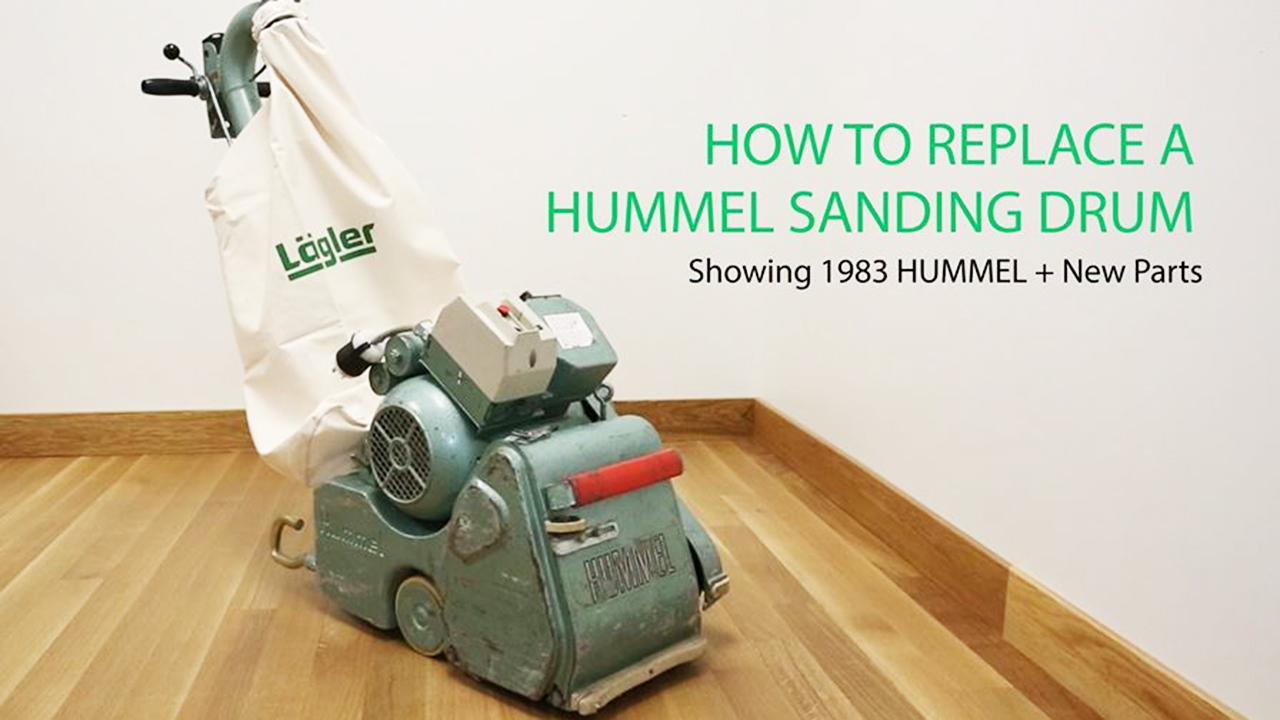
Have you ever compared a decades-old Lägler HUMMEL and a new one, and wondered what’s changed? We get it. At first glance, they look a lot alike. Two things:

1. Don’t change what ain’t broken …

2. … unless you can make it even better.

For Lägler, better happens in micro-innovations, the little refinements that become possible with new technologies and materials. And, improvements happen
with feedback from all you pros using the machines on floors around the world.

Why Lägler Micro-Innovates

Why does Lägler micro-innovate instead of putting out a whole new belt sander beast every so many years? Stop us if you’ve heard this one. The answer is
consistency, for Lägler and for you. (We’ve mentioned consistent quality many times on this blog and social media as a key to success.)

We assume you would like to keep your big machine running, and not feel like you have to replace it to stay on top of your game.

[Video] Meet the Men Who Hand-Build the Lägler HUMMEL | Lägler North America Blog

If you have a HUMMEL (and maintain it properly), or if you talk with someone who does, how many HUMMELs have they had to replace over the years?

A better question is: How many decades have they used their HUMMEL, grinding floors on a daily basis, and not had to replace it?

Like we say, “You buy a new HUMMEL because your business is growing up, not because it’s breaking down.”

Lägler assures compatibility of new parts with existing machines. All new parts work with older models. That’s why the overall look of
Lägler machines has been consistent, despite all the technical refinements every key part of it has received along the way.

Micro-innovations enable you to never be cut off from the parts you need to keep your machine running just like you need
it, for as long as you need it.

A few examples of Lägler micro-innovations are below.

Lägler Parts Compatibility Through Micro-Innovations

Lägler HUMMEL’s Lateral Wheels

Lägler HUMMEL Later Wheel Micro-Innovations | Lägler North America Blog

Micro-innovations mean new-and-improved parts function on older machine models, like the new lateral wheels shown above with a 1983 HUMMEL.

The original lateral wheel design for the HUMMEL had a sheet-metal side wall. The old wheels had considerably more components, too.

The synthetic wheel facing was grouted onto the wheel hub, making it difficult to change out the wheel.

Today’s lateral wheel (P147/P149W),
which is made of lower-wear material is more durable and less likely to leave wheel marks on the floor. It also can be replaced easily without needing
to disassemble the whole wheel unit.

Why this helps you? One step is all it takes now to take off a worn lateral wheel and be able to replace it with a new one: Remove the
one screw and washer set.

Bonus Tip: Lägler recommends cleaning your wheels before every sanding job, and to consider keeping an older set of wheels to put on the
HUMMEL for first passes on tough finish removal. Swap out the wheels again in less than a minute, and you’re set for smooth final cuts.

Lägler HUMMEL’s Upper Roller Unit

Lägler HUMMEL Upper Roller Innovations | Lägler North America Blog

The Lägler HUMMEL upper roller unit is one example of micro-innovation at the company. The current version is on the left.

The upper roller unit originally
was steel. Since 1990, it’s been aluminum.

This material change makes production easier. It takes welding out of the process. The aluminum body of the unit can be made in one cast.

Why this helps you? The aluminum upper roller enables more precise belt control and better tracking adjustment.

Lägler HUMMEL’s Fan

Lägler HUMMEL Fan Insert Innovation | Lägler North America Blog

The Lägler HUMMEL fan insert has been refined over the years. For example, on the early 1990s fan in the photo above (right), the space between the blades
is solid aluminum. The current model (left) benefits from a micro-innovation designed to remove some of that material.

In the beginning, the fan blades were mounted with tongue-and-groove joints. Now, fans are cast as one piece.

The blades originally were symmetrical. They were reworked in 1990, increasing airflow by using an asymmetrical blade design. The cavity between the blades
was increased during a 1997 design upgrade. (P169, Fan Insert Complete)

How these micro-innovations help you? The lifespan of the fan blades increased significantly. Production processes became easier. Overall
quality got better.

All in All: Lägler Micro-Innovations Save You Money

Got a 50-year-old HUMMEL? No problem. Older HUMMEL sanders can be upgraded with the current versions of all parts. Your HUMMEL, no matter its age, will
not be obsolete.

Save money. Don’t replace the sander. Just maintain, replace parts, as needed, and grind on. Then, pass your Lägler down to the next generation when you
retire.

Related Blog Posts

6 Things You Need to Know About Sanding Drums

Sanding Drums: Lägler vs. Aftermarket

#HUMMELtip: Why You Should Sand at Angles and Left to Right

https://www.laglernorthamerica.com/wp-content/uploads/2020/02/Micro-Innovations-Title.jpg 506 900 webmaster https://www.laglernorthamerica.com/wp-content/uploads/2020/02/logo2-300x90.png webmaster2017-04-25 00:31:012020-02-29 00:37:12Lägler Micro-Innovations Make the Difference

6 Things You Need to Know About Sanding Drums

March 28, 2017/in Lägler /by webmaster

HUMMEL owners, tell us: How easy is it to remove and replace your HUMMEL sanding drum? Yeah, easy-easy. DIY in the shop, at your trailer, on the jobsite
floor, right? No need to waste time or money for someone else to do it.

If you haven’t swapped out sanding drums yet, we have a one-minute “How to Replace a HUMMEL Sanding Drum” demo
video on our Lägler North America YouTube channel.

Know Why, How + When to Replace a Sanding Drum

Damaged sanding drums lead to damaged floors. Damaged floors lead to customer complaints, callbacks, re-sanding, and a lot of expense on your part. Needless
to say, it’s far cheaper to pay a little attention to the condition of your drum and replace it, when needed.

When you replace a worn or moderately damaged drum, save it. It’s still of use for first cuts when sanding especially rough floors or decks.

Below are photos of damaged drums and the consequences of continuing to use them when sanding wood floors.

Perpendicular Cuts Through the Drum Rubber

These unwanted cuts in the drum’s rubber come from nails, staples or other sharp objects protruding from the subfloor. Careful subfloor prep avoids this
type damage to a sanding drum.

When sanding with a drum that has this damage, you’ll see “streaks” appear on the floor as you sand. Those lines are raised marks that happen because of
the nail-torn grooves left in the drum not making proper contact with the sanding surface.

A drum with this type of damage needs to be replaced.

Sanding Drum Damaged by Nails or Sharp Objects in Subfloor Wood Floor Streaks Caused by a Damaged Sanding Drum
Material Embedded in Drum Rubber

Loose nails, staples or other debris can stick into the rubber and hold on for the ride. Obviously, that leads to an uneven drum and sanding result. The
debris can damage the drum and belt abrasive. It also leads to gouging the sanding surface.

You might be able to remove the debris from the rubber without leaving or causing damage to the drum. But we recommend you think twice. The slightest damage
can transfer to the floor and, like we’ve said, that becomes way more costly to you.

The safest move is to replace the sanding drum. But save the old drum for special uses, like using it on extra-rough first cuts. That can spare your new
drum some wear, and allow you to put on the new drum for finer cuts.

Sanding Drum Damaged by Sharp Objects Gouges Cut in a Wood Floor by a Damaged Sanding Drum
Unbalanced Sanding Drum

A drum that is out of balance makes uneven contact with the sanding surface, causing chatter (photo below). Poor balance is common with aftermarket drums.
Lägler balances its drums using a specially designed machine at the factory in Germany. It’s not unlike how a mechanic shop balances your truck’s wheels.
And the weight tolerance in Lägler’s process is extremely tight [Read “Sanding Drums: Lägler vs Aftermarket”
to learn how tight, and other stuff].

An unbalanced sanding drum needs to be replaced.

Wood Floor Chatter Can Be Caused by an Unbalanced Sanding Drum

Aged or Worn Out Sanding Drum

The rubber layers of sanding drums age, stiffen and wear out much like car tires do. The shape and flexibility of the rubber changes over time, regardless
of the amount of use. If you are using a “new” drum that sat for years waiting to get into the game but in reality is six to eight years old, it absolutely
is due for replacement, no ifs, ands or buts. Just like with car tires, there is a shelf life on the rubber’s usefulness.

Old, worn out drums tend to cut harder on the edges. Lägler drums are designed to have a “football” shape that feathers toward the edges and avoids those
hard edge-cut lines in the floor. As a drum loses its shape over time, it fails to retain that design.

How long does a drum last? The sanding drum you are using daily should be changed every three years. If you sand somewhat regularly, but
not daily, Lägler recommends replacement every five years. To minimize problems with your sanding drum and get the most out of its performance, keep
it clean between uses and check its condition on a regular basis.

Plan for regular replacement, just like you would plan for regular maintenance for your truck or van. It’s part of the investment for consistent, top-notch
performance of a machine your business relies on.

Old, Worn Out Sanding Drums Cause Poor Floor Sanding Results Marks Left in Wood Floor by Old, Worn Sanding Drum
Dirty Sanding Drum

Dust and debris collect in the aluminum drum cylinder, throwing the balance off. That causes chatter in the floor.

This is easy to avoid with regular cleaning. At least once every month, remove the drum and vacuum out the cylinder. While you’re doing it, look over the
drum’s condition and tend to any maintenance that’s needed.

Sanding Drum Clogged with Dust and Debris Causes Poor Performance

Uneven Floor Caused by Knotty Wood

This is not a sanding drum issue, but a situation that can be fixed with the right use of a sanding drum. Most common on pine and softwood, the knots are
harder and do not sand as well, similar to end-grain or inlays of different species.

For these situations, use Lägler’s hard drum (recognized by its reddish-colored rubber). It is less flexible and cuts more aggressively, the way you need
for the knots.

Knotty Wood Flooring Is Extra-Tough to Sand Lagler's Red Drum Is Designed to be More Aggressive on Knotty Wood Floors

Learn more about Lägler how-to. Subscribe to the Lägler North America newsletter and join us on social media: Instagram, Facebook, Twitter and YouTube.

Related Web Pages

HUMMEL Parts Online Catalog

The Showdown: Lägler TRIO vs Multi-Disc Attachments

HUMMEL. The Icon Builders. [Video]

https://www.laglernorthamerica.com/wp-content/uploads/2020/02/DrumDamage-title.jpg 563 1000 webmaster https://www.laglernorthamerica.com/wp-content/uploads/2020/02/logo2-300x90.png webmaster2017-03-28 00:46:062020-02-29 00:57:476 Things You Need to Know About Sanding Drums

How to Adjust Lägler FLIP Sanding Pressure

July 27, 2016/in Lägler /by webmaster

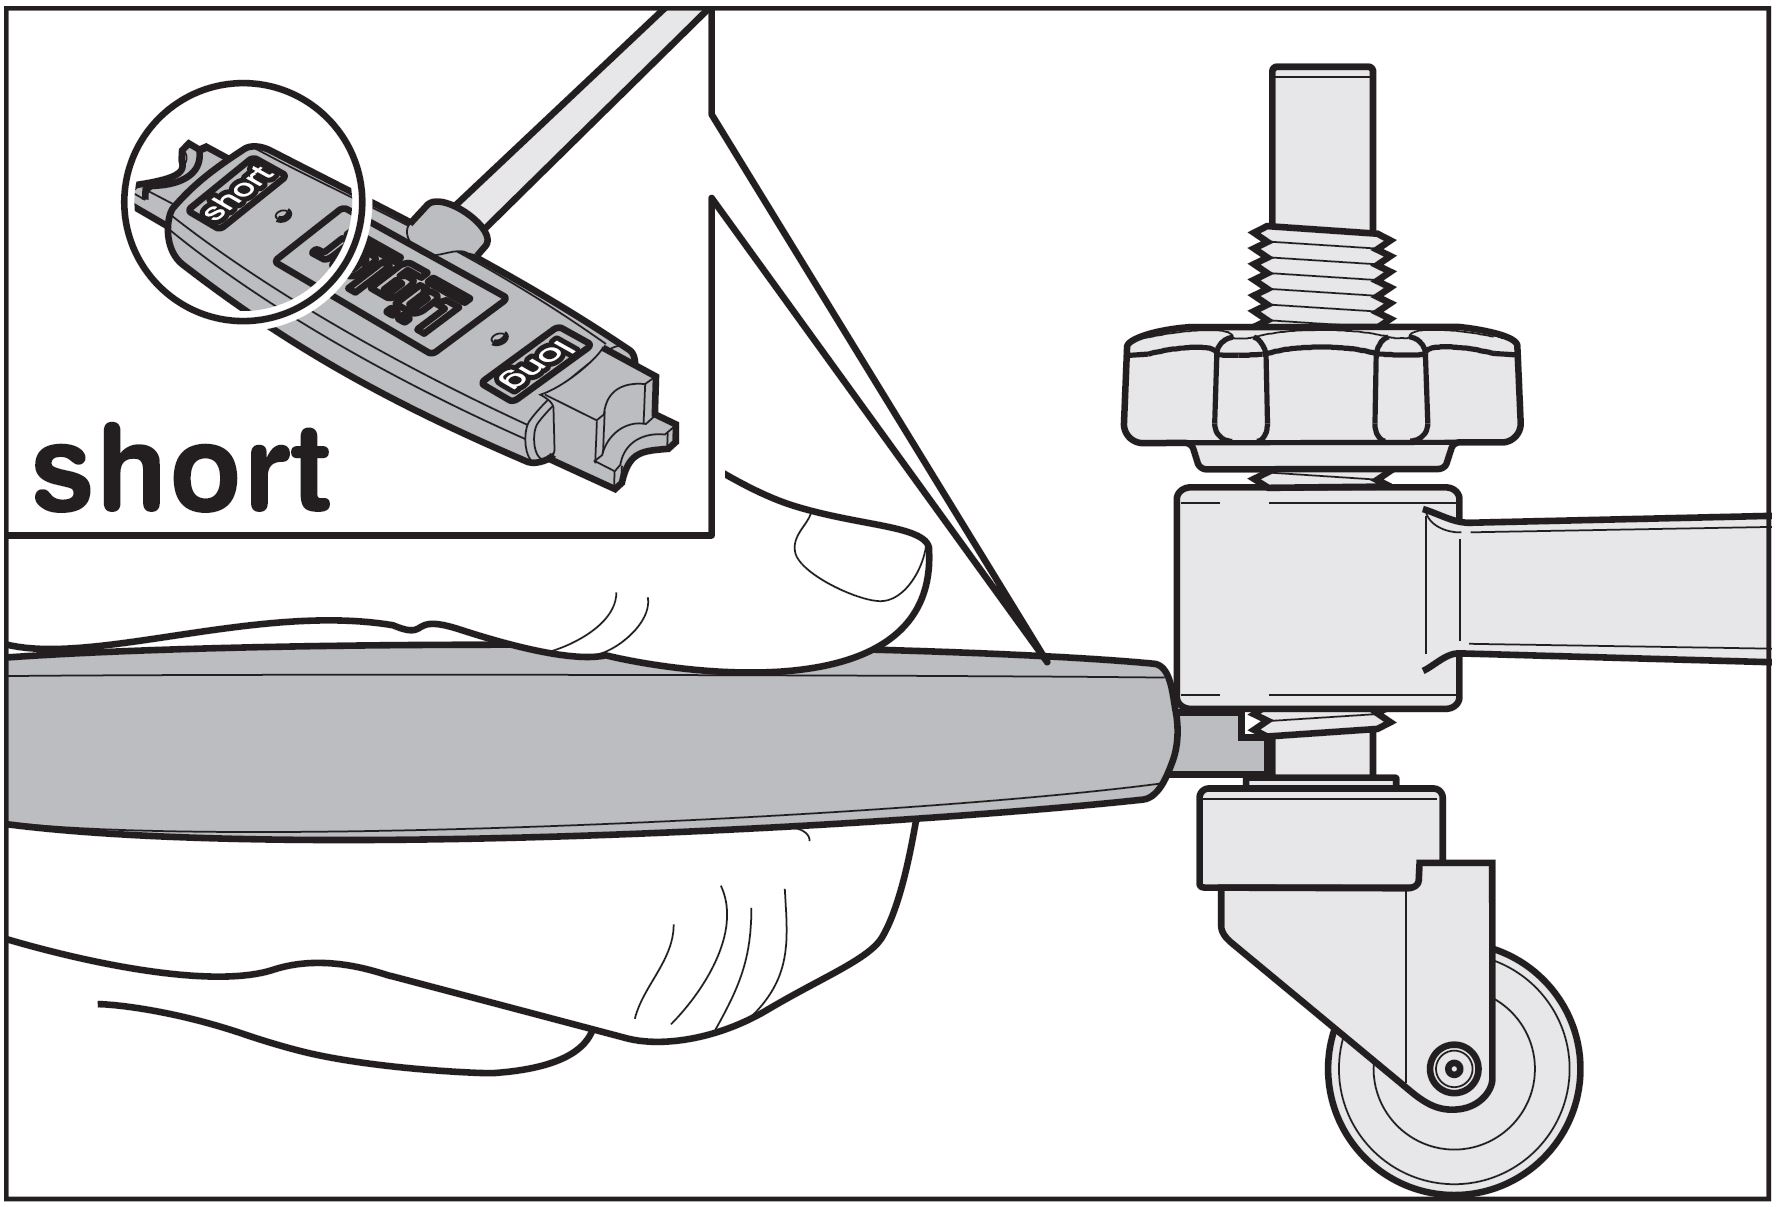
Adjust the Lägler FLIP Wheel Settings to Change Aggressiveness

Did you know you can adjust the aggressiveness of the Lägler FLIP?

It’s not about the pressure you apply. It doesn’t take any more effort on your part.

For rougher or finer sanding with the FLIP, you only need to take a quick minute to adjust the angle of the machine, using the two wheel posts (See “Adjusting
the Guide Rollers” section in the operation manual). You do that with the universal spanner, the T-shaped screwdriver that accompanies a purchase of
a new FLIP.

The black spanner handle is marked with “short” on one end and “long” on the other. Short and long refer to the short and long FLIP attachments. Use the
appropriate end of the spanner handle to apply the standard wheel setting for whichever FLIP attachment you are using. For the corner attachment, use
the short spanner.

It’s important to use the same setting for both wheels. Otherwise, the FLIP will sit unevenly on the floor, and it will cut unevenly.

How to Set the Standard FLIP Wheel Position

With the FLIP turned off and unplugged, follow these easy steps to make sure you are sanding evenly and with the least amount of physical effort:

  1. Loosen the black locknut by hand or by using the universal spanner.
  2. Use the appropriate setting (short or long) to measure the space between the guide roller/wheel and the yellow arm of the FLIP’s fan housing, while
    unscrewing the roller to adjust height.
  3. Retighten the locknut.
  4. Repeat the above steps to set the second guide roller position.

If your settings are even, the sanding area will appear centered in front of the FLIP. Uneven guide roller settings will produce sanding that is off-center
to the left or right, to whichever wheel is set lower.

Adjusting for Fine vs. Rough Sanding

For finer sanding with the FLIP, close the gap between the wheel and the fan housing arm. To increase aggressiveness, increase the space between the wheel
and the fan housing arm.

Another way to look at it is that the higher the locknut is set when tightened, the rougher the FLIP is set to cut. The lower the locknut is set when tightened,
the finer the FLIP is set to sand.

Learn more about using the Lägler FLIP and other Lägler sanding machines.
Become Lägler certified through our Premium Sanding Technology (PST®) training.

Related FLIP Parts

Guide Roller: LNA# P626 | Mfr# 100.45.01.105

Universal Spanner: P1230 | 000.91.40.001

https://www.laglernorthamerica.com/wp-content/uploads/2020/02/FLIPadjustwheel1.JPG 1207 1777 webmaster https://www.laglernorthamerica.com/wp-content/uploads/2020/02/logo2-300x90.png webmaster2016-07-27 18:59:292020-02-29 19:02:43How to Adjust Lägler FLIP Sanding Pressure

How to Replace a Lägler HUMMEL Sanding Drum

June 29, 2016/in Lägler /by webmaster

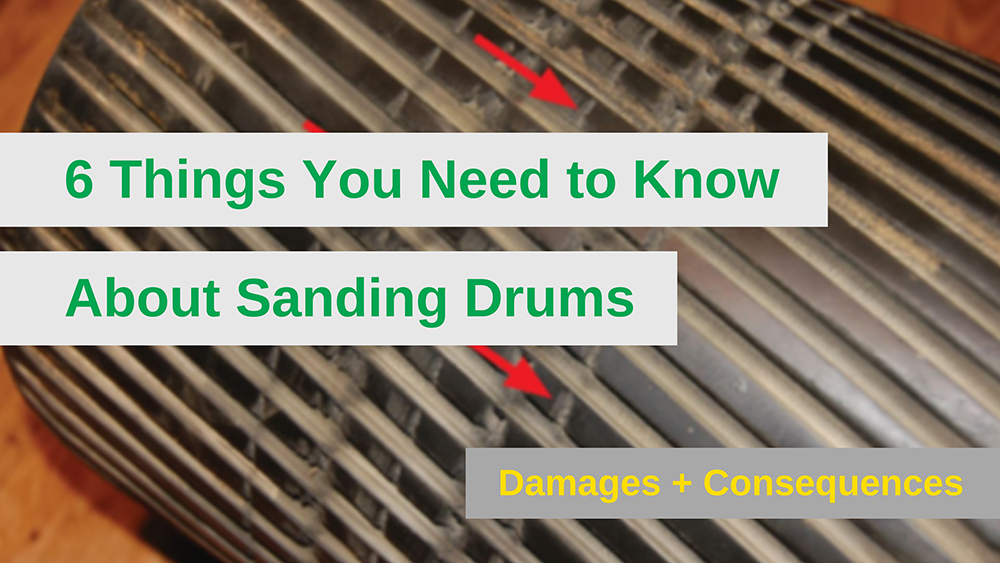
Two important things you need to know about the Lägler HUMMEL sanding drum:

  • Do not dress the drum
  • Drum replacement is easy

The HUMMEL sanding drum has a slight “football” shape to it. Dressing it ruins that design, affecting wood floor sanding results. Dressing a HUMMEL sanding drum causes poor sand paper tracking and chatter, among other problems.

Replacing the drum takes only one to two minutes, whether at your shop or on the jobsite. Instructions for “Replacement of the Sanding Drum” are in the
operating instructions manual that comes with the purchase of each new HUMMEL.

Here are the highlights for how to replace the Lägler HUMMEL sanding drum, as shown using a 1983 HUMMEL and new parts in the short video above. We’re assuming
you’ve already unplugged the machine, have removed the side cover, and have tilted the machine back to rest on its handles and the safety guards at
the bottom.

  1. Remove the sanding belt from the tensioning roller and the sanding drum.
  2. Loosen and remove the drum nut, using the box wrench that comes with purchase of a new HUMMEL, by turning it clockwise (that means
    righty-loosey, not lefty-loosey). You will need to loosen the nut with a mallet tap on the wrench handle.
  3. Turn the sanding drum so that the key way is at the top of the drum, pointing toward the ceiling.
  4. If the drum does not move easily from its shaft, use the handle of your mallet or an appropriately sized piece of wood to gently pry it loose, starting
    to move it off the shaft. Do not hit it with a hammer; that will damage the drum.
  5. Clean the shaft. Mild lubrication is helpful.
  6. Slide the new drum onto the shaft, making sure to align the key way as needed.
  7. When putting the drum nut back onto the shaft make sure to put the side that has a few “missing” threads toward the drum. Otherwise, the drum will
    not be secured in position; it will move on the shaft during use, which can cause chatter on the floor.
  8. Put the side cover back on, stand the machine up, and get back to work.

We recommend you replace a HUMMEL sanding drum once per year to maintain quality sanding results. If you need to order a replacement drum
or other HUMMEL parts, talk with your local distributor, shop online at www.laglernorthamerica.com or call Lägler North America at 800-8-HUMMEL.

Related Lägler HUMMEL Parts

Sanding Drum: P161 (Lägler North America); 120.40.00.100 (Manufacturer/Global)

Drum Nut (Hex Nut LH): P159; 100.02.06.100

Box Wrench: P232; 100.00.45.105

Side Cover: P048; 100.01.03.100

Related Blog Posts

Why You Should Sand at Angles + Left to Right

How to Remove the HUMMEL Motor for Lighter Carrying

What is Lägler Certification?

https://www.laglernorthamerica.com/wp-content/uploads/2020/02/CoverImage.JPG 720 1280 webmaster https://www.laglernorthamerica.com/wp-content/uploads/2020/02/logo2-300x90.png webmaster2016-06-29 00:25:482020-02-26 00:29:18How to Replace a Lägler HUMMEL Sanding Drum

Recent Posts

  • November 16 – 20: Lägler and Loba-Wakol Essential Systems Course, DenverAugust 21, 2020
  • Versatility and Team GreenAugust 18, 2020
  • Precision and Team GreenAugust 18, 2020
  • Durability and Team GreenAugust 18, 2020
  • Tradition and Team GreenAugust 18, 2020
  • The Versatility of LÄGLERAugust 12, 2020
  • The Precision of LÄGLERAugust 12, 2020
  • The Durability of LÄGLERAugust 12, 2020
  • The Tradition of LÄGLERAugust 11, 2020
  • October 19 – 23: Lägler and Loba-Wakol Essential Systems Course North CarolinaAugust 11, 2020

Tags

Abrasives Contractor Education Featured Item Fly-and-Sand How-To How-To Video How to sand a wood floor Lagler Sanding Manual Lägler Certification Training Lägler FLIP Lägler History Lägler HUMMEL Lägler Parts Lägler TRIO Machine Maintenance Marketing Premium Sanding Premium Sanding Technology PST Sanding Drums Social Media Subfloor Prep

Archive

  • August 2020
  • July 2020
  • July 2019
  • December 2017
  • November 2017
  • October 2017
  • September 2017
  • August 2017
  • July 2017
  • June 2017
  • May 2017
  • April 2017
  • March 2017
  • February 2017
  • January 2017
  • December 2016
  • November 2016
  • October 2016
  • September 2016
  • August 2016
  • July 2016
  • June 2016
  • May 2016

Maximize jobsite efficiency. Boost your bottom line.

Earn Lägler Certification

Signup to look, listen + learn through the

Lägler N.A. Newsletter

About Lägler North America

Lägler North America, a division of Palo Duro Hardwoods, is the North American distributor of machines and parts manufactured by Eugen Lägler GmbH in Germany. We are North America’s machine repair center, and offer Lägler’s one-day Premium Sanding Technology (PST®) certification course.

Latest News

Lägler N.A. Is Social May 11, 2016

Lägler North America is building a community via its social pages. Connect with us on Instagram, Facebook, and Twitter to see photos and videos, to learn trade tips, hear about opportunities and more.  

Stay Informed

Click to download the latest Lägler Direkt Newsletter

Download

Copyright © 2020 Lägler North America. All Rights Reserved.

  • Terms & Conditions
  • Shipping & Return Policies
  • Privacy Policy

Scroll to top