• Facebook
  • Instagram
  • Mail
  • Youtube
Call 1-800-8-HUMMEL
  • 0Shopping Cart
Lägler North America
  • Machines
    • SURFACE
      • HUMMEL
      • SUPERHUMMEL
    • FINE SANDING
      • TRIO
      • SINGLE
    • EDGE/STAIRS/CORNER
      • FLIP
      • ELAN
      • UNICO
  • Machine Parts
    • HUMMEL
    • SUPERHUMMEL
    • TRIO
    • FLIP
    • ELAN
    • SINGLE
    • UNICO
  • ABRASIVES
    • Buy Abrasives
  • Blog
  • PST®
  • Newsletter
    • Lägler Direkt Archive
    • Subscribe | Email Newsletter
  • Warranty
  • Contact
    • Become a Distributor
    • Info Request Form
    • Submit Photo | #LaglerOfTheDay
  • News & Events
  • Menu Menu
You are here: Home1 / Blog2 / 20173 / August

How Best to Use the Lägler FLIP

It seems to be something like an open secret that the Lägler FLIP® is engineered for versatility. The information is out there, in Lägler’s “Sanding of Wooden Floors”
manual and in some pieces already on this blog.

But we know how it goes. We haven’t read many manuals either – not for connecting a new device, assembling the kid’s new Hot Wheels race track, or whatever.

So, we’re laying out the essentials here on how you can get the most out of the FLIP.

The edger uses a 6” (150 mm) disc. It can be used to cut
aggressively, finely or on a medium setting, all adjustable with the turn of the rollers.

Sanding attachments can be “flipped” to swap out lengths and diameters, from everyday edging to reaching under radiators and cabinets, to sliding into
tight spots like corners and between spindles.

Versatility.

3 Tips for Using the FLIP

1. Sand clockwise. The FLIP is designed for edge sanding clockwise around a room. The sanding disc rotates clockwise, cutting at the 12
o’clock position. The fiberglass cover of the FLIP’s attachments has a cutout directly over the sanding zone, optimizing its dust suction capability.
(What the super-short video of the FLIP being used to vacuum a pile of dust, and you’ll see what we mean.)

What happens if I sand in a counter-clockwise path around the room? Moving counter-clockwise around the edge of a room will not damage the FLIP.
It will give you a more aggressive cut as you move the edger against the clockwise rotation of the abrasive, which, of course, also means deeper scratches
you will need to work harder to remove later. It also will decrease dust collection, because the clockwise rotation and the suction are designed to
work optimally together.

Lägler FLIP® is engineered for versatility. Learn more in Lägler’s “Sanding of Wooden Floors”

2. Take it easy. Do not press down. The FLIP’s design takes ergonomics into account. It’s built to make edging a
bit easier on your body. If you press down or lean your weight onto the machine, it will decrease the sanding plate speed and give you uneven sanding,
including burn marks. It also will put unnecessary stress on the machine.

So, take it easy. It helps you, the machine and the floor.

3. Choose the right grit abrasives at the right time. If you just sanded the field of the room with your big machine
using a 40-grit belt, use 40 grit on your edger. If you just edged with 80 grit and you’re moving on to your single-disc or multi-disc sander, use
80 grit with that machine.

The last thing you want is for the homeowner to walk in and be able to see a band around the edge of the room where it doesn’t match with the field. Successful
floor sanding is one of those mysteries you get to keep to yourself and let them wonder how you made their floor look so awesome. If they can see how
the magic is made, it ain’t being made well.

Bonus Tip: The white wheel that is screwed onto the top of the short/standard and long FLIP attachments is your wall roller. Notice the
track it sits in allows you to set the position of the wheel. Just loosen the screw, adjust the wheel to let you closer or farther from the wall, tighten
the screw.

How to Use the FLIP Corner Attachment

Don’t let the name of the FLIP corner attachment fool you. It’s not just for corners.

In fact, when this attachment is at its most valuable to you probably is not in the corners. It’s sliding between spindles, around tight spots with radiators,
getting around pipes, and anywhere else a 6” disc isn’t the machine for the moment.

The corner attachment has a 2 3/8” (60 mm) diameter. And it rips fast, with RPMs cranking almost two and a half times as fast as the FLIP’s short and long
attachments you do most of your edging with.

3 Tips for Using the FLIP Corner Attachment

1. Sand counter-clockwise. Yeah, that’s opposite of what we are saying above when sanding with the short
and long attachments. But, in general, you’re quick-hitting small spots where you’re not going to be running along the wall, right? Not much room to
run between spindles. So, this is just a heads-up, letting you know how the attachment is designed to be used.

3 Tips for Using the Lägler FLIP® Corner Attachment | Lägler North America Blog

2. Use the flexible Velcro ring. Always. Sand with the donut between the abrasive and the sanding disc.

3. Use the finest grit possible. Like a boxer, you want to minimize your time in the corners, don’t you? And keep
the bonus tip in mind, too …

Bonus tip: The speed of rip of the corner attachment sanding disc heats up the abrasive pretty quickly. Tip #3 above spotlights fine grits,
which will reduce some of the need to change paper, but when it’s time for a new abrasive, be aware the heat can melt the abrasive to the donut.

How to Avoid the Paper and Flexible Ring Sticking Together

1. Take a water break. Set the FLIP aside for a brief cool down period before pulling the abrasive off the machine.

2. Tag team. Keep a second donut and abrasive ready to go. You can swap in the fresh set keep grinding while the first set is cooling
down.

All this information is in two of Lägler’s manuals: “Sanding of Wooden Floors” and “FLIP Operation, Maintenance, Safety.”

Both are available for free download at laegler.com.

It’s also part of Lägler’s Premium Sanding Technology (PST®) certification training.
You can schedule that for you and your crew with us in Denver, or make a European vacation of it by heading to England or Germany.

Related Blog Posts

How to Minimize Sanding Efforts + Maximize Business Profits

Big Machine Sanding Direction, Speed + Pressure

Abrasives: Cost vs Value of Quality

https://www.laglernorthamerica.com/wp-content/uploads/2020/02/HowUseFLIP-title.jpg 422 750 webmaster https://www.laglernorthamerica.com/wp-content/uploads/2020/02/logo2-300x90.png webmaster2017-08-29 03:52:142020-02-26 03:57:39How Best to Use the Lägler FLIP

Sanding With A Big Machine

A lot of floor sanding pros probably are confident in their “how to sand with a big machine” knowledge. Many of you should be. Yet here we are talking
about it, so hang with us …

We talk with flooring pros everyday about basic techniques and why they are the best way to go. In Lägler PST® training, when contractors and distributors
call us (800-8-HUMMEL, if you need it), at NWFA Expo,
answering questions via social media DMs – everywhere.

So, it’s worth double-checking your know-how and, at the least, you can send the new guy on your crew to this post and the many others we’ve put up on
the Lägler North America blog.

To help, here’s a list of the big machine blog articles we’ve posted in the past year:

  • How to Test Floor Flatness Using the Drum Lever
  • Big Machine Sanding Direction, Speed + Pressure
  • Big Machine Sanding Path Displacement
  • 6 Things You Need to Know About Sanding Drums
  • Sanding Drums: Lägler vs. After-Market
  • Leveling Your HUMMEL Wheels
  • Why To Sand at Angles + Left to Right
  • How to Remove the HUMMEL Motor
  • How to Replace A HUMMEL Sanding Drum
  • Four Reasons Not to Wire Brush with a HUMMEL

If you have a copy of the Lägler sanding manual,
that’s the good stuff we base blog posts like this one on.

http://www.laegler.com/en/downloads.html

Choosing the Starting Abrasive Grit

We know when you start a job and get the big machine on the floor, you’re ready to rip. But how do you decide what grit abrasive to start with?

That decision right there – what grit to start with – can make or break efficiency on the job. It can lead to spending more time and money than you want,
if you don’t nail it.

If you start with too coarse an abrasive, you’re cutting deeper scratches that will take more effort to remove. If you go too fine, you’re creating more
work for yourself to go over it again.

Q: How do you know what grit you to start with?

A: Test sanding

Make your best guess of what grit belt to put on the drum to start the test, but go as fine a grit as you think will work. If the first grit you try isn’t
the one, move to the next grit you think is best. Testing doesn’t take long to do, and not nearly as long as the alternatives. It will save you headaches.

Always sand with as coarse a grit as necessary and as fine a grit as possible.

Below are two images from the Lägler manual, “Sanding of Wooden Floors.”

The first one shows how to approach grit sequence when using a multi-disc sander in your lineup.

The second one shows grit sequence when using the conventional setup, that is without using a multi-disc machine.

Learn more about best methods for using a big machine, multi-disc sander and edger. Read the Lägler N.A. blog and subscribe to the Lägler N.A. monthly email newsletter.


How to Choose the Right Grit Abrasive When Sanding Wood Floors | Lagler North America Blog


How to Sand Wood Floors Using the Lagler Method | Lagler North America Blog

https://www.laglernorthamerica.com/wp-content/uploads/2020/02/SandingBigMachine.jpg 422 750 webmaster https://www.laglernorthamerica.com/wp-content/uploads/2020/02/logo2-300x90.png webmaster2017-08-15 04:37:562020-02-26 04:43:22Sanding With A Big Machine

How to Test Floor Flatness with a Big Machine

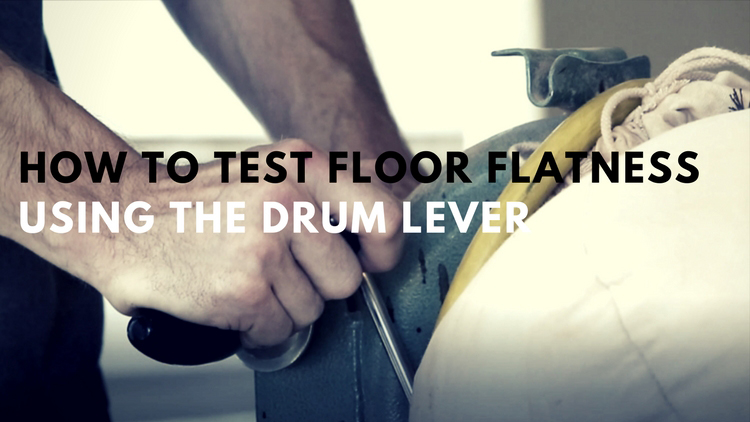
Besides getting awesome Instagram shots on the job, of course, getting the floor flat is the most important part of sanding wood floors.

But that’s harder to get just right if you don’t take a few minutes to figure out the flatness situation before you get started. You’ve got to know what’s
out of whack with the floor so you can game plan how to make it the level of flat you – and the homeowner — want.

We know you know the feel of unevenness when you’re sanding, and sometimes it’s easy enough to see. But taking some minutes to mark out the uneven spots
will make the job easier.

Here’s a simple flatness test you can do with your big machine, before you start sanding.

Watch the Lägler HUMMEL Icon Builders Video | Lägler North America Blog

Check Floor Flatness Using Your Drum Lever

Use these quick and easy steps to help you mark out high and low spots of uneven wood flooring. It will make those areas easier to see when you’re sanding.

1. Put a fine-grit, used abrasive belt on your drum.

2. Make sure your machine is turned off.

3. Lower the drum to the floor.

4. Roll the big machine at an angle across the boards, paying attention to the drum lever’s movement. If the lever moves up, the floor is rising. If it
moves down, the floor is sloping downward.

5. When the drum lever moves more than a little bit up or down, mark the area as high or low with a pencil.

If you do that to the whole room, you’ll be able to step back when you’re done marking out the spots and see the game plan laid out in front of you. High
here, low there. Low right over here, high over there.

These kinds of prep steps save you hassles later in the process. By doing everything you can to knock the floor flat upfront with your big machine, the
fine sanding steps will go much better. If not, the unevenness will continue through each step, making you have to work harder all the along the way.

Free Floor Sanding Manual from Lägler

Learn more about work-smart sanding techniques in Lägler’s “Sanding of Wooden Floors” manual. Download the full manual for free at laegler.com.

Want a chance to improve on a practice floor with Lägler at your side? Call us to set a date for you and your crew to get Lägler certified: 800-848-6635
(800-8-HUMMEL).

Learn more about Lägler Premium Sanding Technology (PST®) training on
our blog, too.

Related Blog Posts

How to Minimize Sanding Efforts + Maximize Business Profits

Big Machine Sanding Direction, Speed + Pressure

Abrasives: Cost vs Value of Quality

https://www.laglernorthamerica.com/wp-content/uploads/2020/02/TestFlatness-title.JPG 422 750 webmaster https://www.laglernorthamerica.com/wp-content/uploads/2020/02/logo2-300x90.png webmaster2017-08-01 23:51:172020-02-28 23:51:44How to Test Floor Flatness with a Big Machine

Recent Posts

  • June 1 – 3, 2022: Denver Lägler Sanding + Berger-Seidle Product Intro & Application CourseJanuary 4, 2022
  • June 8-10, 2022: Lägler & Absolute Coatings Sand, Prime, Stain, & Finish CourseJanuary 4, 2022
  • July 26-28, 2022: Hosting the NWFA Intermediate Installation + CP TestingJanuary 4, 2022
  • August 23-25, 2022: Wadesboro Lägler + Loba Wakol Prep, Sand, & Finish CourseJanuary 4, 2022
  • September 20-22, 2022: Bowling Green Hands-On Training with Basic CoatingsJanuary 4, 2022
  • October 20-21, 2022: Denver Two-Day Basic Sand & Finish with Basic CoatingsJanuary 4, 2022
  • October 24-28, 2022: Denver Lägler Sanding + Berger-Seidle Advanced CourseJanuary 4, 2022
  • November 8-10, 2022: Hosting the NWFA- Intermediate Sand & Finish + CP TestingJanuary 4, 2022
  • November 15-17, 2022: Bowling Green Hands-On Training with Basic CoatingsJanuary 4, 2022
  • December 14-16, 2022: Denver Lägler + Loba Wakol Prep, Sand, & Finish CourseJanuary 4, 2022

Tags

Abrasives Contractor Education Featured Item Fly-and-Sand How-To How-To Video How to sand a wood floor Lagler Sanding Manual Lägler Certification Training Lägler FLIP Lägler History Lägler HUMMEL Lägler Parts Lägler TRIO Machine Maintenance Marketing Premium Sanding Premium Sanding Technology PST Sanding Drums Social Media Subfloor Prep

Archive

  • January 2022
  • May 2021
  • August 2020
  • July 2019
  • December 2017
  • November 2017
  • October 2017
  • September 2017
  • August 2017
  • July 2017
  • June 2017
  • May 2017
  • April 2017
  • March 2017
  • February 2017
  • January 2017
  • December 2016
  • November 2016
  • October 2016
  • September 2016
  • August 2016
  • July 2016
  • June 2016
  • May 2016

Maximize jobsite efficiency. Boost your bottom line.

Earn Lägler Certification

Signup to look, listen + learn through the

Lägler N.A. Newsletter

About Lägler North America

Lägler North America, a division of Palo Duro Hardwoods, is the North American distributor of machines and parts manufactured by Eugen Lägler GmbH in Germany. We are North America’s machine repair center, and offer Lägler’s one-day Premium Sanding Technology (PST®) certification course.

Latest News

Lägler N.A. Is Social May 11, 2016

Lägler North America is building a community via its social pages. Connect with us on Instagram, Facebook, and Twitter to see photos and videos, to learn trade tips, hear about opportunities and more.  

Stay Informed

Click to download the latest Lägler Direkt Newsletter

Download

Copyright © 2020 Lägler North America. All Rights Reserved.

  • Terms & Conditions
  • Shipping & Return Policies
  • Privacy Policy

Scroll to top