• Facebook
  • Instagram
  • Mail
  • Youtube
Call 1-800-8-HUMMEL
  • 0Shopping Cart
Lägler North America
  • Machines
    • SURFACE
      • HUMMEL
      • SUPERHUMMEL
    • FINE SANDING
      • TRIO
      • SINGLE
    • EDGE/STAIRS/CORNER
      • FLIP
      • ELAN
      • UNICO
  • Machine Parts
    • HUMMEL
    • SUPERHUMMEL
    • TRIO
    • FLIP
    • ELAN
    • SINGLE
    • UNICO
  • ABRASIVES
    • Buy Abrasives
  • Blog
  • PST®
  • Newsletter
    • Lägler Direkt Archive
    • Subscribe | Email Newsletter
  • Warranty
  • Contact
    • Info Request Form
    • Submit Photo | #LaglerOfTheDay
  • News & Events
  • Fly & Sand 2021
  • Menu Menu
You are here: Home1 / Blog2 / 20163 / July

How to Adjust Lägler FLIP Sanding Pressure

July 27, 2016/in Lägler /by webmaster

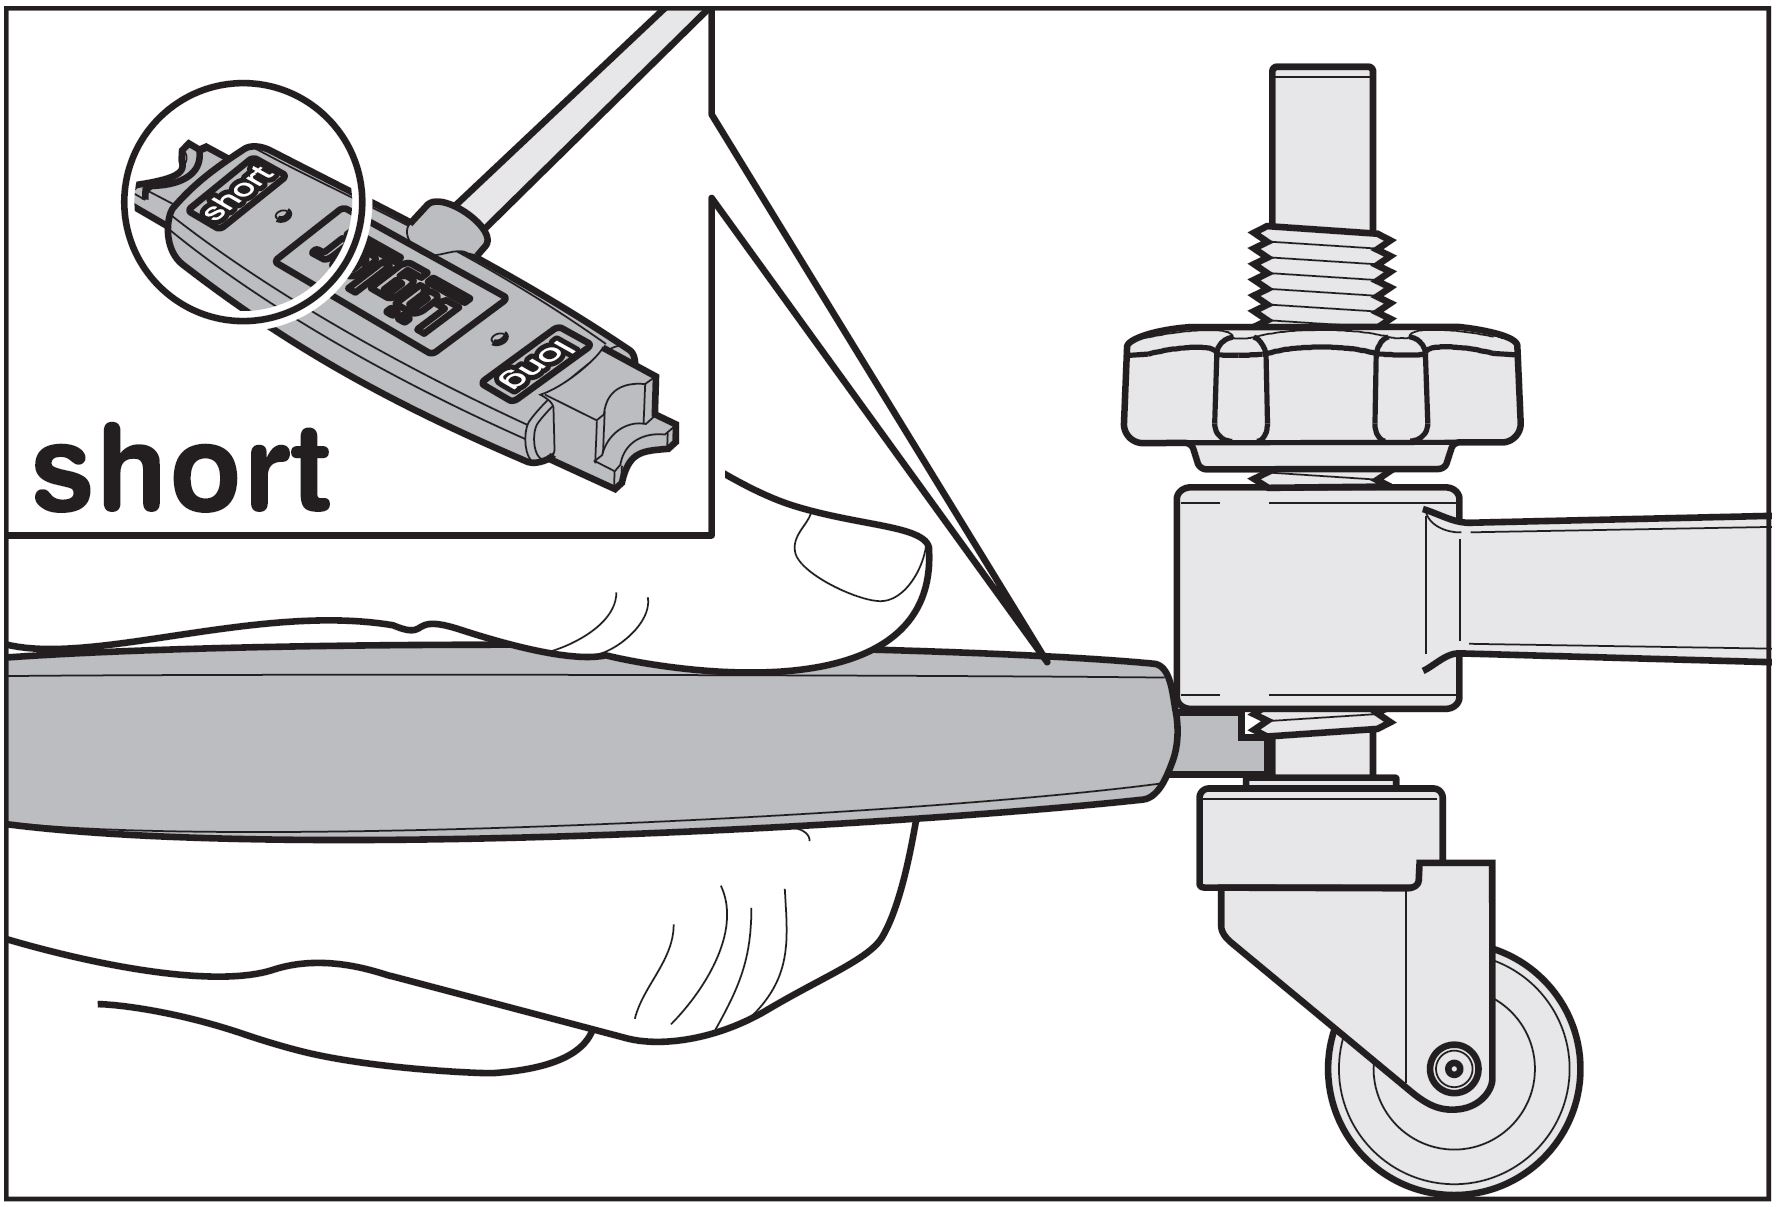
Adjust the Lägler FLIP Wheel Settings to Change Aggressiveness

Did you know you can adjust the aggressiveness of the Lägler FLIP?

It’s not about the pressure you apply. It doesn’t take any more effort on your part.

For rougher or finer sanding with the FLIP, you only need to take a quick minute to adjust the angle of the machine, using the two wheel posts (See “Adjusting
the Guide Rollers” section in the operation manual). You do that with the universal spanner, the T-shaped screwdriver that accompanies a purchase of
a new FLIP.

The black spanner handle is marked with “short” on one end and “long” on the other. Short and long refer to the short and long FLIP attachments. Use the
appropriate end of the spanner handle to apply the standard wheel setting for whichever FLIP attachment you are using. For the corner attachment, use
the short spanner.

It’s important to use the same setting for both wheels. Otherwise, the FLIP will sit unevenly on the floor, and it will cut unevenly.

How to Set the Standard FLIP Wheel Position

With the FLIP turned off and unplugged, follow these easy steps to make sure you are sanding evenly and with the least amount of physical effort:

  1. Loosen the black locknut by hand or by using the universal spanner.
  2. Use the appropriate setting (short or long) to measure the space between the guide roller/wheel and the yellow arm of the FLIP’s fan housing, while
    unscrewing the roller to adjust height.
  3. Retighten the locknut.
  4. Repeat the above steps to set the second guide roller position.

If your settings are even, the sanding area will appear centered in front of the FLIP. Uneven guide roller settings will produce sanding that is off-center
to the left or right, to whichever wheel is set lower.

Adjusting for Fine vs. Rough Sanding

For finer sanding with the FLIP, close the gap between the wheel and the fan housing arm. To increase aggressiveness, increase the space between the wheel
and the fan housing arm.

Another way to look at it is that the higher the locknut is set when tightened, the rougher the FLIP is set to cut. The lower the locknut is set when tightened,
the finer the FLIP is set to sand.

Learn more about using the Lägler FLIP and other Lägler sanding machines.
Become Lägler certified through our Premium Sanding Technology (PST®) training.

Related FLIP Parts

Guide Roller: LNA# P626 | Mfr# 100.45.01.105

Universal Spanner: P1230 | 000.91.40.001

https://www.laglernorthamerica.com/wp-content/uploads/2020/02/FLIPadjustwheel1.JPG 1207 1777 webmaster https://www.laglernorthamerica.com/wp-content/uploads/2020/02/logo2-300x90.png webmaster2016-07-27 18:59:292020-02-29 19:02:43How to Adjust Lägler FLIP Sanding Pressure

How to Dismantle + Reassemble the Lägler TRIO Filter Unit

July 13, 2016/in Lägler /by webmaster

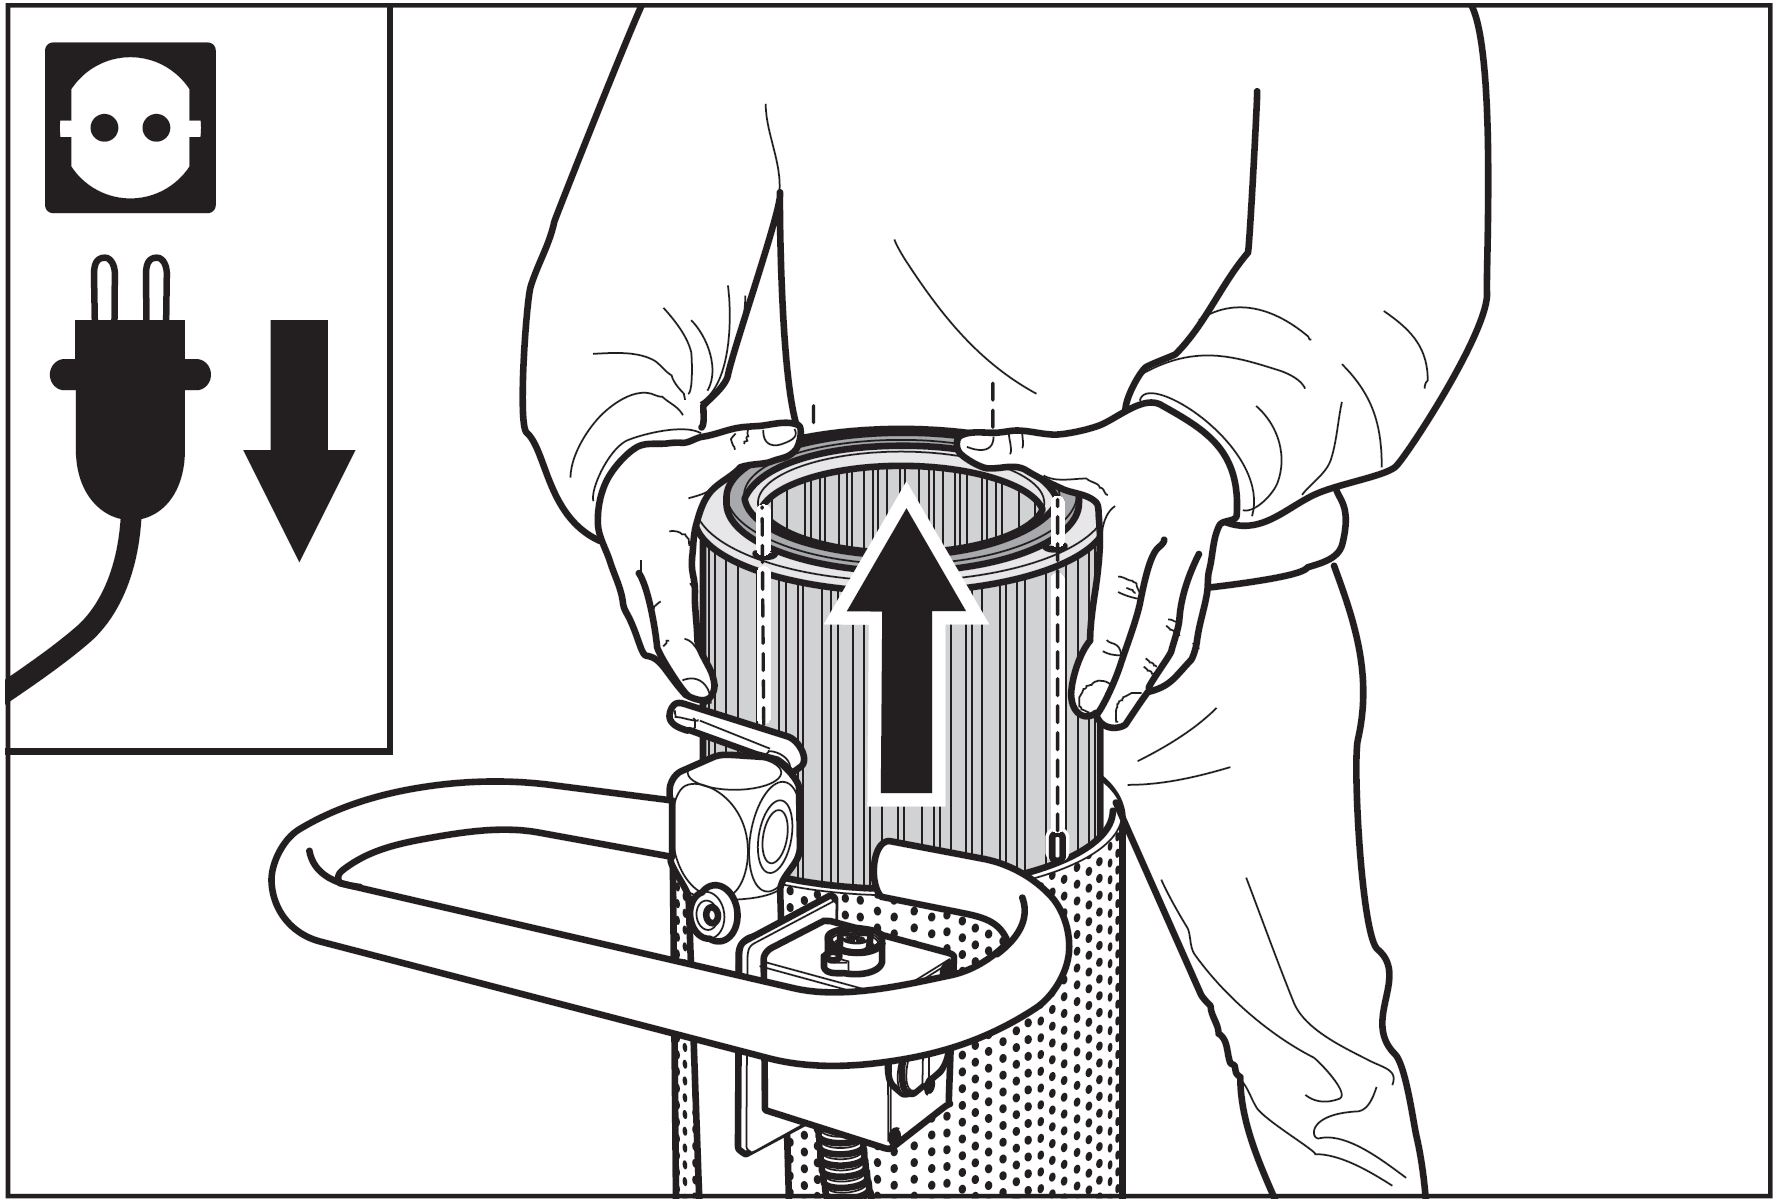
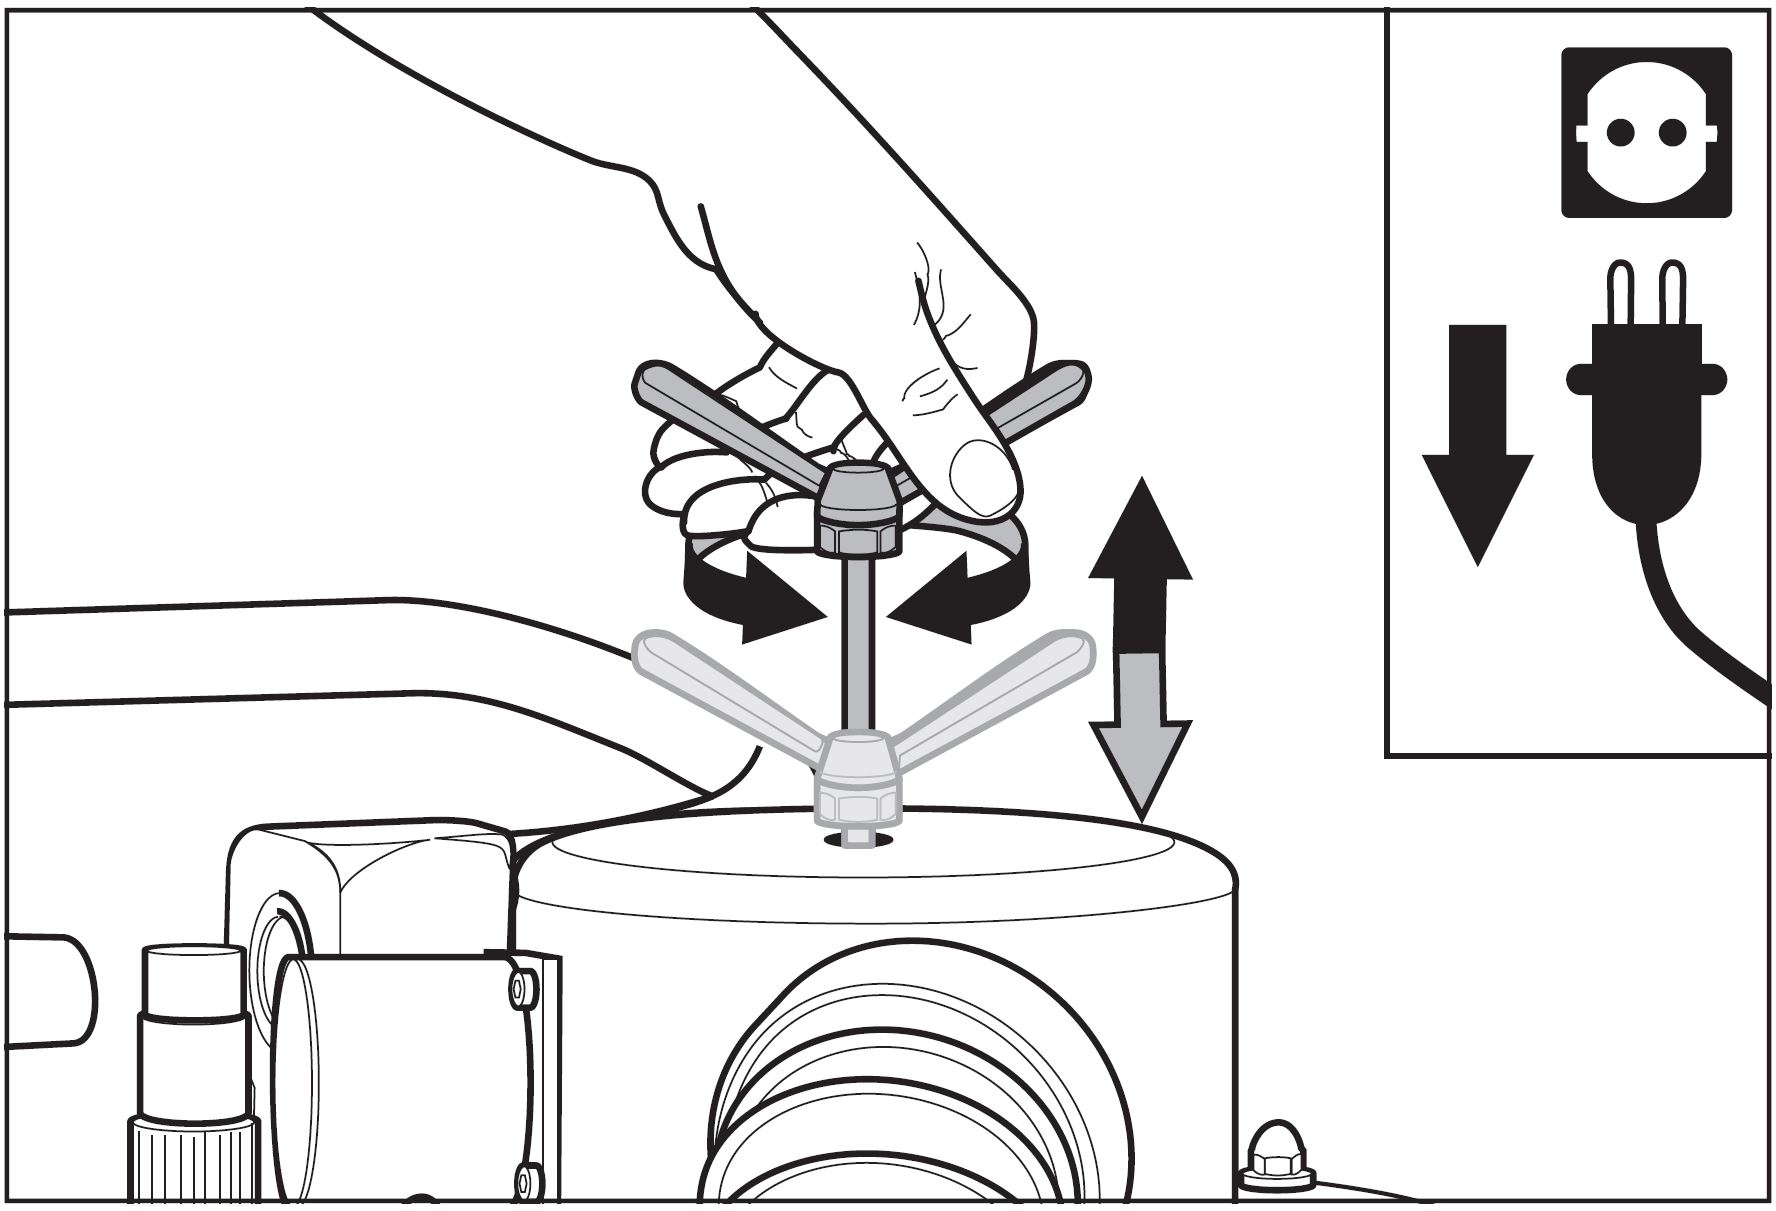
It’s easy to dismantle and reassemble the Lägler TRIO filter unit. You know it’s time to do this if:

  • You are needing to clean the filter more often than each time you change dust bags
  • The machine’s suction has decreased
  • Dust is being emitted into the environment during use

Cleaning the Lägler TRIO filter starts with the wing screw on top (Read “How to Clean the Lägler TRIO Filter”).

If you have used the wing screw and its attached rod with brushes (inside the filter unit) to knock the dust from your TRIO filter, but the machine is
showing signs of decreased suction and increased dust emission, it’s time to take cleaning the next level.

How to Remove the TRIO Filter Unit

To remove the clogged filter, first ensure the TRIO is turned off and the power supply is disconnected, then:

  1. Unseat the cable plug of the sensor on top of the on/off switch by turning the ring nut and pulling off the cable plug.
  2. Unhook the on/off switch from the chassis and hook it onto transport holder on the front of the switchbox (to the left of the motor).
  3. Remove the dust suction hose from the neck of the dust separator.
  4. Before removing the filter cover, slide a flooring board between the closed dust containment cylinder and the chassis to prevent the cylinder from
    falling during removal.
  5. Remove the four cap nuts on top of the filter unit/separator cover and lift the cover off the machine.
  6. Lift the filter out of the filter casing to clean or replace it, as needed.

How to Reassemble the TRIO Filter Unit

  1. Before inserting the cleaned or new TRIO filter, make sure the rubber seals are in the groove on the filter.
  2. Slide the filter onto the four screws from above, being careful not to damage the filter.
  3. When placing the cover back onto the machine, insert the perforated metal into the cover so that it touches the inside of the ridge.
  4. Put the washers on the screws that stick out the cover and put the cap nuts back on loosely; do not tighten yet.
  5. If necessary, open the flap on the dust containment cylinder for access to the bottom part of the fourth screw to ensure it is reseated properly. Remember
    to put the washer on the fourth screw before placing the cap nut back on.
  6. Using the wingnut on top of the filter unit, push the cleaning slide all the way down.
  7. Check the relative positions of all the parts again before tightening the cap nuts, and tighten them with care not to bend the cover in the process.
  8. Unhook the on/off switch from the transport holder and replace in its working position below the machine’s handle.
  9. Insert the plug of the sensor back onto the on/off switch and secure the ring nut.
  10. Put the suction hose back on and reconnect the TRIO to the power supply.

Continue learning and getting the most out of your Lägler sanders:

  1. Subscribe to Lägler North America’s monthly newsletter to receive email notifications of our latest blog posts and videos.
  2. Follow us on social media: @laglerna on Instagram and Twitter, and @laglernorthamerica on Facebook.
  3. Subscribe to our new YouTube channel.
https://www.laglernorthamerica.com/wp-content/uploads/2020/02/TRIOfilter-removing.JPG 1201 1779 webmaster https://www.laglernorthamerica.com/wp-content/uploads/2020/02/logo2-300x90.png webmaster2016-07-13 19:05:222020-02-29 19:08:04How to Dismantle + Reassemble the Lägler TRIO Filter Unit

How to Clean the Lägler TRIO Filter

July 13, 2016/in Lägler /by webmaster

Have you seen our tag #MaintenanceMatters? We use it on Instagram, Facebook and Twitter. Because it’s true, maintenance matters to your machines and your business’ success. Plus, we like to talk about the matters of maintenance.

So here’s another one that should be happening every day when you use your Lägler TRIO fine wood floor sanding machine.

Three things to know about cleaning the TRIO fine sanding machine filter unit:

  1. The filter should be cleaned after each dust bag change; it only takes a few moments.
  2. Do not blow compressed air into the dust bag container or the neck of the suction hose; it can damage the pressure control sensor.
  3. Failing to clean the filter unit will decrease dust suction, make the TRIO perform less efficiently, and dust emission into the environment will increase.

Three Steps to Basic Cleaning of the TRIO Filter

There are only three steps to knock the dust out of the filter and into the dust bag, assuming you already have turned off and unplugged the machine. These steps only take five seconds:

  • Grab the wing screw on top of the filter unit on top of the TRIO, then gently pull it upward. That moves the cleaning rod and brushes located inside
    the filter unit. Watch the video above to see how the TRIO’s internal filter cleaning system works.
  • Slowly turn the wing screw side to side, back and forth; then move it up and down a few times, knocking dust into the dust bag.
  • When finished with step two, push the wing screw/slide all the way down, or the machine’s suction will be decreased.

If these simple steps do not sufficiently clean the filter or if it seems like you are needing to repeat this cleaning process too often, the filter likely
is clogged.

In that case, you need to dismantle the filter unit for more thorough cleaning. Read “How to Dismantle and Reassemble the Lägler TRIO Filter Unit.”


Related Lägler TRIO Parts

Separator (Dust Containment + Filter Unit): P1010 (Lägler N.A.), 900.00.16.100

Wing Nut/Screw: P028, 000.20.45.083

Filter Brush: P1015, 900.16.45.105

Filter: P952, 900.16.18.105


Subscribe to Lägler North America’s monthly newsletter to learn more.

https://www.laglernorthamerica.com/wp-content/uploads/2020/02/TRIOfilter-cleaning.JPG 1211 1776 webmaster https://www.laglernorthamerica.com/wp-content/uploads/2020/02/logo2-300x90.png webmaster2016-07-13 19:03:112020-02-29 19:04:55How to Clean the Lägler TRIO Filter

Recent Posts

  • November 16 – 20: Lägler and Loba-Wakol Essential Systems Course, DenverAugust 21, 2020
  • Versatility and Team GreenAugust 18, 2020
  • Precision and Team GreenAugust 18, 2020
  • Durability and Team GreenAugust 18, 2020
  • Tradition and Team GreenAugust 18, 2020
  • The Versatility of LÄGLERAugust 12, 2020
  • The Precision of LÄGLERAugust 12, 2020
  • The Durability of LÄGLERAugust 12, 2020
  • The Tradition of LÄGLERAugust 11, 2020
  • October 19 – 23: Lägler and Loba-Wakol Essential Systems Course North CarolinaAugust 11, 2020

Tags

Abrasives Contractor Education Featured Item Fly-and-Sand How-To How-To Video How to sand a wood floor Lagler Sanding Manual Lägler Certification Training Lägler FLIP Lägler History Lägler HUMMEL Lägler Parts Lägler TRIO Machine Maintenance Marketing Premium Sanding Premium Sanding Technology PST Sanding Drums Social Media Subfloor Prep

Archive

  • August 2020
  • July 2020
  • July 2019
  • December 2017
  • November 2017
  • October 2017
  • September 2017
  • August 2017
  • July 2017
  • June 2017
  • May 2017
  • April 2017
  • March 2017
  • February 2017
  • January 2017
  • December 2016
  • November 2016
  • October 2016
  • September 2016
  • August 2016
  • July 2016
  • June 2016
  • May 2016

Maximize jobsite efficiency. Boost your bottom line.

Earn Lägler Certification

Signup to look, listen + learn through the

Lägler N.A. Newsletter

About Lägler North America

Lägler North America, a division of Palo Duro Hardwoods, is the North American distributor of machines and parts manufactured by Eugen Lägler GmbH in Germany. We are North America’s machine repair center, and offer Lägler’s one-day Premium Sanding Technology (PST®) certification course.

Latest News

Lägler N.A. Is Social May 11, 2016

Lägler North America is building a community via its social pages. Connect with us on Instagram, Facebook, and Twitter to see photos and videos, to learn trade tips, hear about opportunities and more.  

Stay Informed

Click to download the latest Lägler Direkt Newsletter

Download

Copyright © 2020 Lägler North America. All Rights Reserved.

  • Terms & Conditions
  • Shipping & Return Policies
  • Privacy Policy

Scroll to top