
Have you noticed your Lägler FLIP® acting a bit different lately? Maybe you’re having a tough time starting it or the working speed has decreased.
Maybe it feels like it isn’t running as smoothly as usual or the noise has gotten louder. The FLIP might be losing its steam to suck dust. It’s maintenance
time.
All machines need a hug from time to time, and parts need to be replaced. It’s no different than routinely changing the oil on your truck. New oil, smooth
ride.
New V-belt, new edger.
Over time, residue accumulates in the pulleys and in the attachment. The issues mentioned above start happening and you know it’s time to take a look under
the hood and replace the V-belt. While you’re there, check whether the fan housing and blades to see if there is buildup there that needs to be dealt
with too.
The V-belt must be replaced, at the latest, when it cannot be retightened because the screws for connecting the attachment are at the end of the holes.
Special note: The V-belt should run without touching the ground of the pulley. The belt’s left and right edges should rest against the inner edges
of the pulley.
Step-by-step instructions for removing and installing the V-belt for the Lägler FLIP edger are listed below. They also are shown in the video above, using
the illustrations from the Lägler FLIP Operations Manual.
How to Remove the V-Belt on the Lägler FLIP
Assuming you’ve already turned off and unplugged the FLIP:
1. Lay the machine on its side or with the motor housing on a table. Avoid damages to the floor or table and the machine.
2. Undo the screw of the belt tightening plate (at the back of the attachment) with the universal spanner, the special T-grip driver (P1230 | 000.91.40.001) that comes with the purchase of a new FLIP.

3. Turn the belt tightening plate away from the attachment and re-tighten the screw of the belt tightening plate.
4. Use the universal spanner to remove the two screws that connect the attachment, along with the washers and the guide angles. Place these parts to the
side.
5. Remove the attachment from the machine and put down the attachment with the sanding disc facing upward.

6. Use the universal spanner to undo the fixing screws of the attachment cover and remove this from the attachment.
7. Turn the attachment over.
8. Use the universal spanner to undo the four fixing screws of the complete sanding disc.
9. Remove the attachment from the complete sanding disc.
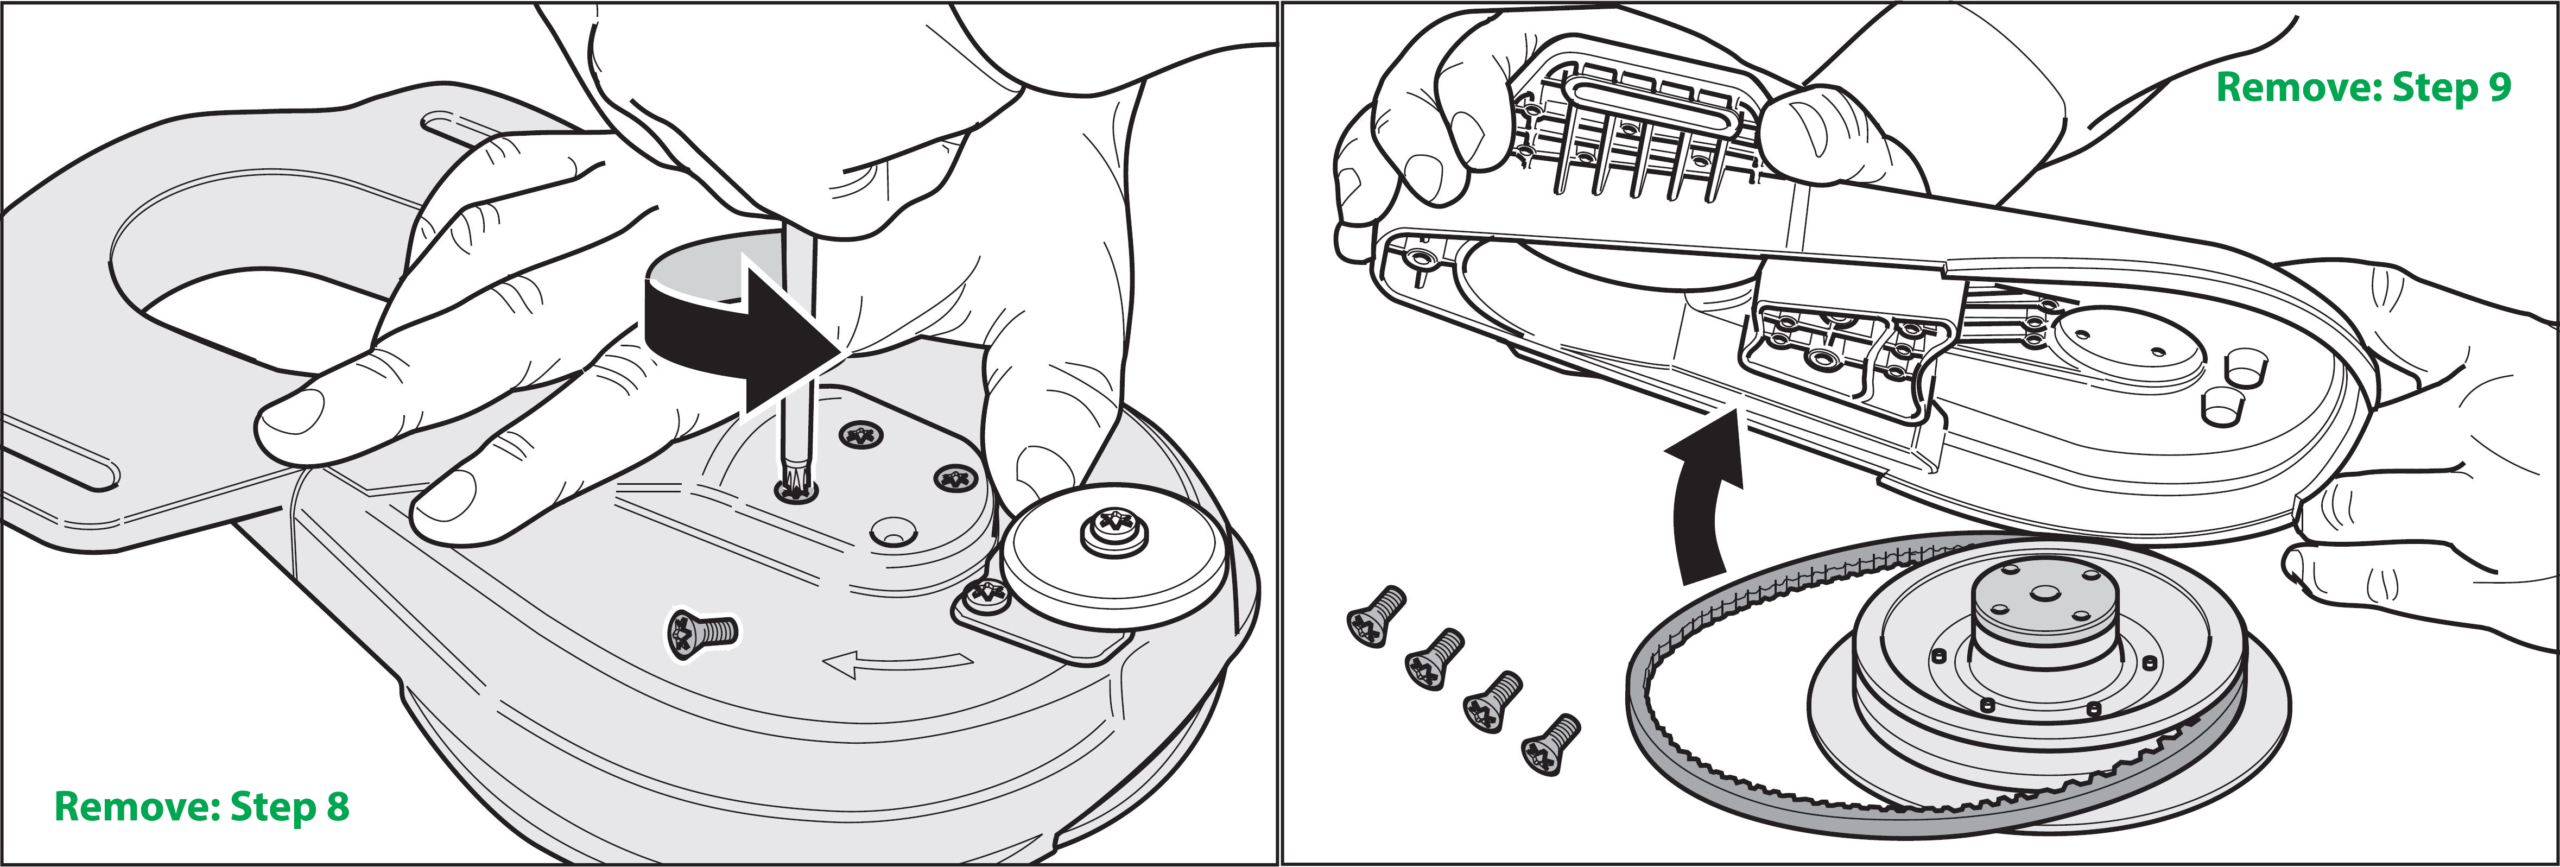

10. Dispose of the worn-out V-belt.
11. Check whether the sanding plate pulley or the motor pulley are worn-out. Replace these parts if necessary. If one pulley appears to be worn out, then
both will be. Here are two signs of a worn out pulley:
12. Clean the two pulleys and the attachment. Wear a respiratory protective mask if necessary.
How to Install the V-Belt on the Lägler FLIP
1. Place the new V-belt on the complete sanding plate pulley.
2. Insert the complete sanding plate with V-belt in the attachment. Ensure that the holes of the complete sanding plate are aligned with the holes in the
attachment.

3. Make sure the sanding plate can be turned by hand and the V-belt is correctly placed in the attachment.
4. Turn the attachment over and tighten the four screws for attaching the complete sanding plate using the universal spanner.
5. Push the attachment over the motor pulley and insert the V-belt into the motor pulley.
6. Put on the attachment cover.

7. Tighten the two screws for connecting the attachment, placing a washer and guide angle in the respective threads of the fan housing. Do not tighten the screws all the way yet.
Make sure the belt tightening plate is not located between the attachment and the fan housing. Otherwise, a significant amount of dust will escape
from this area during sanding.
8. Tighten the V-belt. (See the “How to Tighten the Lägler FLIP V-Belt” section below.)
After a few days’ use to break-in the new belt, check the belt tension. Tighten again as necessary.
How to Tighten the Lägler FLIP V-Belt
1. Lay the machine on its side or with the motor housing on a table. Avoid damages to the floor or table and the machine.
2. Use the universal spanner to loosen the two screws that connect the attachment to the fan housing.
3. Use the universal spanner to loosen the screw that attaches the belt tightening plate.
4. Hold the FLIP® by the fan housing and press the belt tightening plate forward toward the attachment at the same time with your thumb. Use
your other hand and the universal spanner to retighten the three screws.
Learn more about maintaining and getting the most out of your Lägler FLIP and
other Lägler sanding machines by subscribing to the Lägler North America monthly email newsletter,
and by following us on Instagram, Facebook and Twitter.
Related Blog Posts